You need this like a hole in the head

Tag: git Page 1 of 2

Git Bundles – A Beginner’s Guide

I recently ran into a situation at work where I needed to share a Git repo “across an air gap.” In other words, I needed to be able to read a Git repo without actually having read access to the Git repo. I did some research and found out that this can be done with Git Bundles, but when I tried to look for info on how to actually USE Git Bundles, I mostly found a lot of Stack Overflow and Reddit threads with 23 year old know-it-alls providing helpful tips like “That’s stupid. Why would you ever need to do this?” The answer is that you work for a financial services company and they are paranoid to give developers access to anything that exists on the internet. Anyway, enough ranting. I pieced together a method for using Git Bundles that worked well for me and I thought I’d share it.

So here’s the setup:
A company we’ll call “OutsourcePro” is hired to build an application for your employer, who we will call “FullTimeJob.” OutSourcePro uses private Bitbucket repos for all of their projects and they offer to provide the devs at FullTimeJob access to the repos for purposes of doing regular code reviews. Unfortunately, FullTimeJob is a financial services company and finds the internet to be too scary to allow anything like Git repo access. So, FullTimeJob’s developers are told that they can’t have the access.

OutSourcePro offers to send a giant zip file with the entire project at intervals of their choosing (rarely or never). But, FullTimeJob’s developers find out about Git Bundles. FullTimeJob devs tell OutSourcePro to provide a Git Bundle every Tuesday and Friday. This will allow FullTimeJob devs to review the changes without needing to read every single line of code to figure out what’s different. FullTimeJob’s security experts agree that receiving a giant zip file via email twice a week is more secure than accessing a private Git repo directly (um… okay). Great! But, now what? The interwebs have very little useful info on how Git Bundles actually work. So, a developer at FullTimeJob does some experimenting and comes up with a plan:

Method 1: One-way Traffic
This assumes that all development work is being done by OutSourcePro and that FullTimeJob’s developers only need read-access for code reviews and whatnot. Developers at FullTimeJob will not be committing or pushing any code.

  1. OutSourcePro creates a private Git repo (on Github, Bitbucket, or somewhere else).
  2. FullTimeJob creates a corresponding Gitlab repo on their proprietary, enterprise Git server.
  3. OutSourcePro does daily work and pushes ALL changes to to their private Git repo (including work in progress)
  4. On Tuesdays and Fridays, an OutSourcePro developer pulls ALL commits from ALL branches to their local repository.
  5. The OutSourcePro developer creates a git bundle:
    git bundle create outsourcepro_DDMMYY.bundle –all
  6. The OutSourcePro emails the bundle to FullTimeJob
  7. A FullTimeJob developer copies the bundle to their Desktop and clones it to a new folder:
    git clone /Users/FullTimeJobDev/Desktop/outsourcepro_MMDDYYYY.bundle
  8. This will clone it into a folder named for the bundle: outsourcepro_DDMMYYYY
  9. The FullTimeJob Developer should then point the origin of the new local clone to their private enterprise Git server:
    git remote set-url origin https://ftjgitlab.com/project/repo-name.git
  10. Once the origin has been set, the FullTimeJob developer can push all changes from the local clone to the enterprise remote.
  11. Once all the changes have been pushed, the local clone should be deleted from the FullTimeJob developer’s Desktop.
  12. Now, all FullTimeJob developers can fetch/pull the changes from the enterprise remote to their local repos.

Basically, this process allows you to make a duplicate of the Git repository on your own server and keep up with the changes being made by the OutSourcePro team.

Method 2: Two-way Traffic
What if developers on BOTH teams needed to make changes to the code? This use case is actually very similar, with both teams sending Git bundles to each other and following the process above. But there are a few tips I will suggest to make it easier:

  • Don’t cross the streams! Before starting the project, decide what each team will name the branches on their Git repos, and make sure that the two teams are ALWAYS USING SEPARATE BRANCHES. Same-named branches will cause chaos. In our example:
    • FullTimeJob will eventually own all of this code, so they name their main branches “dev” and “master.” All other branches on their end will be named “ftj-something.”
    • OutSourcePro will eventually hand over all of the code, so they name their main branches “osp-dev” and “osp-master.” All other branches will also be named “osp-something.”
  • Decide who will do the merging into the final repo branches. Again, in our case:
    • FullTimeJob will own the code and the final project will reside in the “dev” and “master” branches create by FullTimeJob. So, only FullTimeJob developers are allowed to merge code into these branches.
    • Similarly, OutSourcePro owns all of the “osp-” branches and only OutSourcePro devs are allowed to merge anything into those branches.
  • Both teams should be merging the other team’s work into their branches regularly and resolving the conflicts.
  • Nail down specific times when new bundles will be delivered to each team so that the syncing and merging can be done at scheduled times.

That’s it! I suggest testing this out internally before you try to do it in a real-life scenario. Have two developers act as members of the two teams. One developer can create a git bundle and send it to the second dev, who will follow the process of trying to duplicate it to a new repository. Then, have the first dev make some commits and send another Git bundle to the second dev who tries to add the changes to their duplicate repo. Good Luck and let me know if I missed any important details!

Converting SVN repos to Git (for dummies)

We used to use Subversion (SVN) for all of our source control at work a few years ago. Then, we switched over to Git a while back. I had several old projects still stored in our SVN account at codebasehq.com and I needed to migrate them to Git repos. A few of them were work projects that needed to be moved to Github. Others were personal projects that I wanted to store on BitBucket. I spent several hours combing through blog posts figuring this out, so I thought I’d make a “dummies” guide on how to do this for people like me who are not Git experts. For this conversion, you will need:

  • Sourcetree – a great, free Git GUI. Get it here
  • Git installed on the command line. Sourcetree has it’s own Git client, but we will need to do some command line stuff. Unfortunately, I can’t offer any tips on setting up Git. I did it several years ago and didn’t make any notes on it.
  • A mac. Sorry, but these instructions are for mac users. They will be very similar for PC users, but may need slight modification.

Once you have those things, here’s what you do:

  1. Create a folder on your machine where you will store your files during this process. I created one called “SVN_TO_GIT” on my desktop.
  2. Log in to your SVN account and find the SVN repo you want to convert. browse through the files and try to get a list of the user ids that have made commits. For example, in one of my work projects, I found the following user IDs:
    andytb9
    johnboy
    andy
    john
    toolbox
  3. Create an authors.txt file to convert the old svn IDs to git emails. This is really simple. Just save a blank text file in the folder you created above as “authors.txt”. In this file, add a line for each of the user IDs you found in Step 2. These lines specify how to convert the SVN user IDs:
    andy = Andy Watt <andy@gmail.com>
    andytb9 = Andy Watt <andy@gmail.com>
    johnboy = John Doe <john@gmail.com>
    john = John Doe <john@gmail.com>
    toolbox = Andy Watt <andy@gmail.com>

    **Note how you can actually re-map the project contributors. I could simply assign all SVN IDs to my email if I want.

  4. Create a subfolder in the SVN_TO_GIT folder you already created. This folder will hold the repo that you will convert, so name it something that makes sense. For this example, I will name mine “REPO_1”.
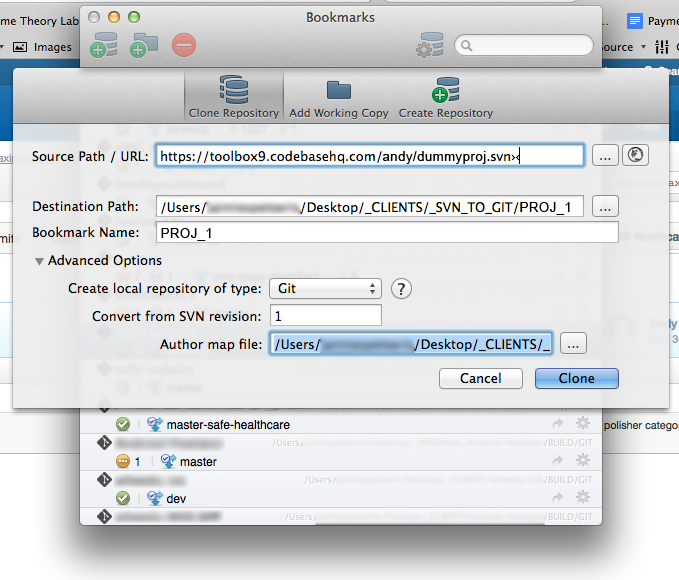
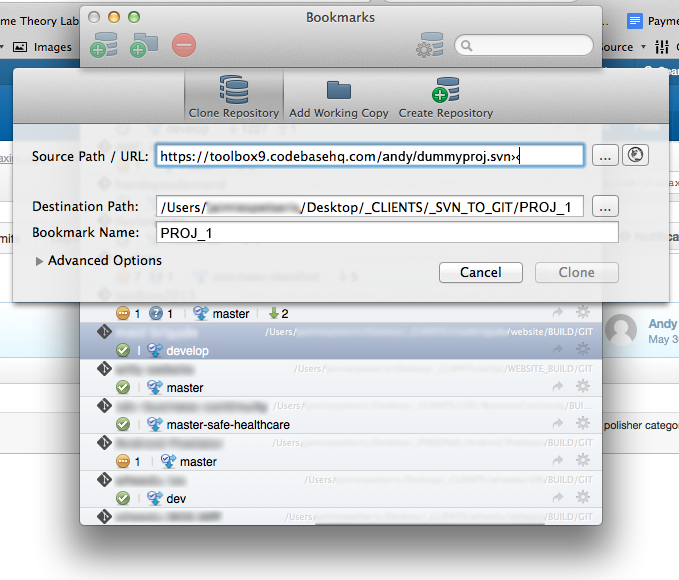
  5. Open Sourcetree and clone the SVN repo into the REPO_1 folder you created above. Clone it as if it was a Git repo, but enter the URL of the SVN repo. You will probably need to enter your user name and password for the SVN account here.svn-to-git-1-clone-svn
    Sourcetree will notice that it’s an SVN repo and ask you for some details on how to convert it:

    • Create local repository of type: Git
    • Convert from SVN revision: 1
    • Author map file: (browse to your authors.txt file)

    svn-to-git-2-options-svn
    BTW, after you enter your SVN credentials, make sure that Sourcetree is still planning to save your cloned repo into the REPO_1 folder. Sourcetree has a quirk that sometimes changes this destination folder unexpectedly.

  6. Click “clone”
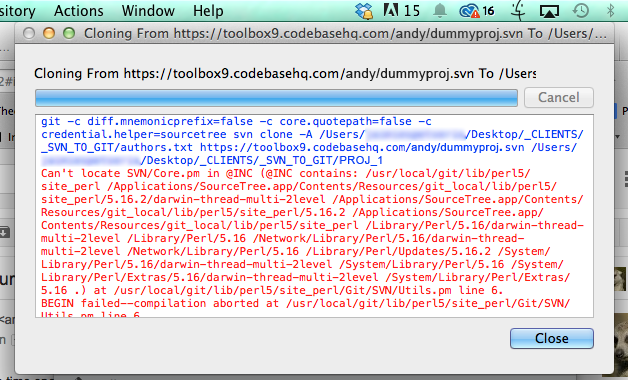
  7. If you get an error about “Can’t locate SVN/Core.pm”, go here and follow the instructions to get everything hooked up correctly.
    svn-to-git-3-cant-locate-core-svn
  8. Or… if you get a crazy error like this:
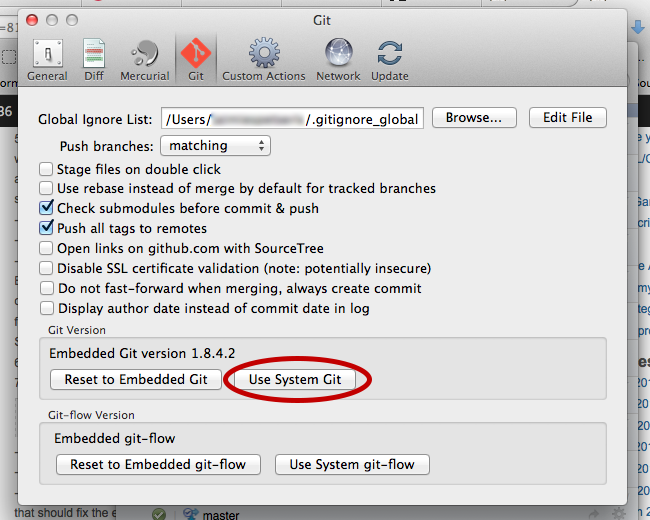
    Can't locate object method path via package Git::SVN at /usr/local/git/lib/perl5/site_perl/Git/SVN/Ra.pm line 338.
    • go to Sourcetree > Preferences.
    • click on the Git tab at the top.
    • near the bottom, change the Git version to “Use system Git”
    • locate the system Git executable file on your machine. You can do a search in finder for “git” and look for a file with that name – the icon will look like a terminal window.
    • that should fix the error

    svn-to-git-error-use-system-git

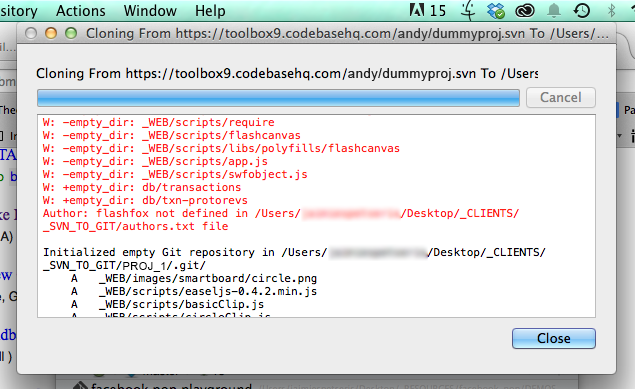
  9. Show the output and check for errors. If it clones successfully, you’re almost done! If not, you probably forgot a user in the authors.txt file. Scan the errors to see if it is bonking on a user id. Add the conversion to your authors.txt file and try again.
    svn-to-git-error-author-not-defined
  10. Log in to Github, Bitbucket, or the Git account of your choice. Create a new repo. Be sure to specify whether this is a public or private repo. I did not add a readme, but it’s ok if you do.
  11. Copy the url for the new Github repo that you created (in my example: https://github.com/andy/dummy-project.git)
  12. On your mac, open a terminal window
  13. cd (change directory) to the SVN_TO_GIT/REPO_1 folder that now contains your cloned repo.
  14. run the following commands:
    git remote set-url origin
    git remote set-url origin https://github.com/andy/dummy-project.git
    git push origin master
  15. Alternative method if the previous steps didn’t work for you:
    cd /path/to/my/repogit 
    remote add origin https://tb9andy@bitbucket.org/andy/dummy-project.git
    git push -u origin --all 
    git push -u origin --tags
  16. After it finishes, log in to github and take a look at your awesome new git repo with all of its commit history. Pat yourself on the back for your awesomeness.
  17. Create a new folder on your local machine and clone the new github repo into it. This is the local folder you should work from. Don’t work from the SVN_TO_GIT/REPO_1 folder you created. You should be able to delete that now.
  18. You should remove the old SVN remote and any local references to it on your machine once you’re sure that everything has converted correctly.

If you need to convert an old SVN repository to Git, I hope this will save you some time. If I missed anything, leave a comment and let me know.

Using Intellij IDEA for Actionscript Development

I’ve been a die-hard Windows guy for a long time, but this year I switched to using a Mac so I could learn some iOS development. Since I made the switch, there are a few PC-only programs I miss. One of them is FlashDevelop – which I use(d) for all of my Flash/Actionscript work.

Flash is dying – that’s a fact. Not many new projects are being built in Actionscript these days, but I still get some Flash work trickling in now and then. I’ll also have a need to maintain or update older Flash projects for a few more years, so I need a good Actionscript IDE on my Mac. I tried running FlashDevelop on Parallels, but there were a few nagging problems with it that made it less than optimal. After doing some research on Actionscript IDEs for the Mac, I settled on Intellij IDEA. I was already using PHPStorm and I liked it a lot, so I thought I would give Intellij a try.

It’s been a great IDE for AS3 work. I like it almost as much as FlashDevelop, but the documentation is lacking a bit. Figuring out how to tweak the project settings was a hassle, so I made a video tutorial showing how to set up an Actionscript project in Intellij IDEA:

BTW, Intellij IDEA is an awesome all-around IDE that is definitely worth the $200 license. I use it for basically everything. Check it out for all of your HTML, CSS, javascript, PHP, Ruby, Rails, and JAVA needs.

Creating a simple iOS game – Bouncing Babies

The first post in my iOS game development series

I like to create games that use interesting gameplay mechanics – things I’ve never seen before, or an interesting twist on a classic game. The problem is that new mechanics are difficult to code. If you want to make something standard, like a Super Mario clone, it’s easy to find a game engine that will do most of the work for you. But new mechanics often require modifying a game engine, or even creating one from scratch. This can be time consuming and frustrating.

I’ve been working on a conceptual game prototype for a while now and it has me pulling my hair out at the moment. To make matters worse, this is a “stripped down” version of a larger game that I want to create. I thought this light version of my concept would be easier to code, but it has turned out to be pretty complex too.

In the meantime, I’m interested in creating a game for iOS. So, I’ve decided to create a very simple game from scratch and blog about the entire process. I’ve never created anything for iOS, so I will have a lot to learn. I also plan to post all of my progress publicly on github, so anyone who wants to follow along can pull my code and see what I’m doing. Since this is a learning process, there will likely be a lot of bad code and blind alleys. And since I have a day job and a family, progress is likely to be slow.

With these constraints in mind, I’ve decided not to design my own game entirely from scratch because I will inevitably add some seemingly simple gameplay element that will derail the entire process. Instead, I’ve decided to remake a classic DOS game from back in the day…

Bouncing Babies was a deceptively simple arcade game that I used to play on my first PC – a Tandy 1000 (yes, I’m old). Here’s a video of the game:

Like all classic action arcade games, the gameplay is simple, but it’s surprisingly addictive. It was one of my favorite games when I was a kid and there are few good remakes of it. Considering my time constraints, this is a project that I might actually be able to finish in a reasonable time period. Additionally, the game code shouldn’t be too complex, so development shouldn’t require any weird hackery (famous last words). I can still do a full redesign of the graphics and animation, but the gameplay will be the same.

So, stay tuned for more updates as I dive into this. This whole project may go down in flames, but I promise it will be an interesting ride.

Here’s a link to the github repo I will be using:
https://github.com/wastedpotential/bouncing-babies

Page 1 of 2

Powered by WordPress & Theme by Anders Norén