Trepanning for gold

Category: iOS Game Dev Page 1 of 2

Running XCode projects on a device without a developer account in XCode 7

One of the announcements at WWDC 2015 was that developers would be able to test apps on devices without a paid Apple developer account in XCode 7. I was just about to drop $99 on a developer account so I could test a personal project on my devices. So, I decided to dig in and figure out how to do this.

IMPORTANT NOTES BEFORE YOU START:

  • You can’t do this if you have any developer accounts in XCode. This makes sense, really. If you have a developer account, then you can already test your projects on a device and you don’t need to do this.
  • If you follow the steps below, your accounts will change across ALL versions of XCode on your Mac. So, if you need to keep your developer accounts in XCode 6, do NOT follow these steps.

Now that you’ve been properly warned about the ramifications, let’s get started…

Step 1: Download XCode 7 beta. Please note that XCode  7 beta is still pretty rough and you may need to go back to XCode 6 for certain things.

Step 2: Remove any developer accounts in Xcode. Open XCode Preferences and go to the accounts tab. You can’t have any accounts in here that are connected to any Apple Developer accounts. This means that you can’t have a paid developer account, but it also means that your Apple ID can’t be part of any free developer accounts (like Safari development). If there are any developer accounts in here, you need to delete them. The easiest thing to do is simply delete ALL of the accounts listed in here, then add them back in later as needed.

Notice how the Apple ID I’m using says “Free” under the iOS and Mac headings:
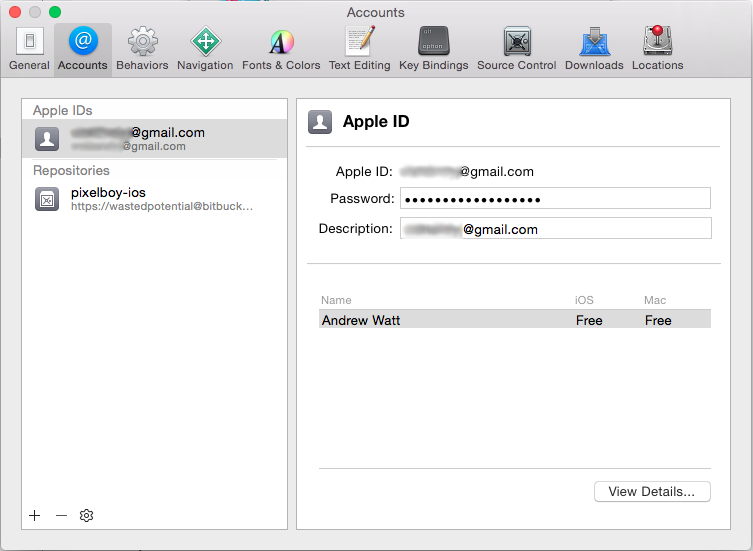
xcode_acct_prefs

Step 3: Open an Xcode project and connect your device to your Mac.

Step 4: Check your project build settings. Choose your project target in your XCode project settings and go to the Build Settings tab. Make sure that your Code Signing is set to iOS Developer and your Provisioning Profile is set to automatic.
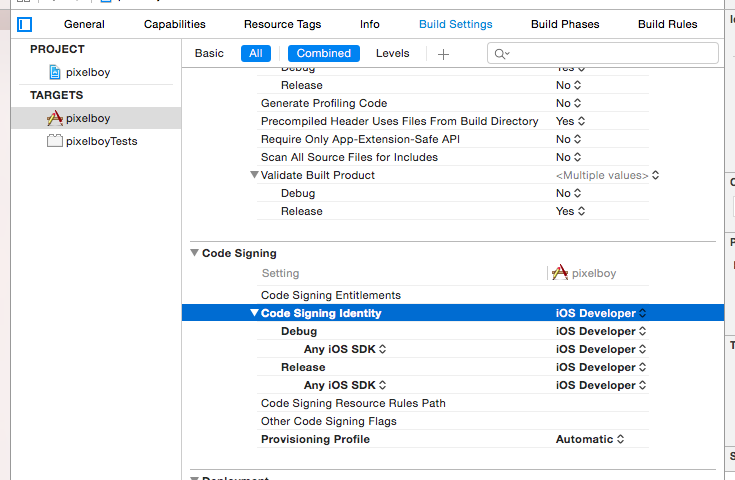
xcode_provisioning

Step 5:  set target device in XCode as shown:
xcode_set_device_target

Step 6: Run the app from Xcode

Step 7: Choose the account you want to use. If you deleted all of your accounts in step 2, you will be prompted to sign in with an Apple ID. Again, you must use an Apple ID that is not tied to a developer account.

Step 8: Apple may prompt you to fix issues with your certificate or provisioning profile. If this happens, click the “fix issue” button and let Xcode handle it for you.

If this process fails for any reason, here are some other things you can do:

  • Open Keychain Access on your Mac and delete any development certificates in here. I had some old, expired certificates in my keychain and deleting them cleared up some problems.
  • Go back to XCode preferences and check that the Apple ID you used is not connected to any developer accounts
  • Worst case scenario: remove all accounts from Xcode preferences and create a brand new Apple ID with a new email address. This should force XCode to use a free account.

Just like any normal Xcode provisioning, it sometimes takes a little fiddling around to get it working. If you find any other tips, leave them in the comments.

Good Luck!

iOS SpriteKit Memory Leaks

I was building a SpriteKit game at work the other day and ran into a couple of annoying issues that were causing memory leaks in my app. The first one was created when I set up the GameScene (an SKScene subclass) in my view controller:

- (void)viewDidLoad {
    [super viewDidLoad];
    SKView * skView = (SKView *)self.view;
    
    // Create and present the scene.
    GameScene * scene = [GameScene sceneWithSize:skView.bounds.size];
    scene.scaleMode = SKSceneScaleModeAspectFill;
    [skView presentScene:scene];
}

There’s one big problem with the code above: the view bounds haven’t been set in viewDidLoad. So, the GameScene size will probably be wrong. No problem, we’ll just move it to where we know the view bounds have been set:

- (void)viewWillLayoutSubviews {
    [super viewWillLayoutSubviews];
    SKView * skView = (SKView *)self.view;
    
    // Create and present the scene.
    GameScene * scene = [GameScene sceneWithSize:skView.bounds.size];
    scene.scaleMode = SKSceneScaleModeAspectFill;
    [skView presentScene:scene];
}

…except for one thing. Now, the GameScene gets recreated every time you come to the ViewController. If you are doing everything inside SpriteKit, then this isn’t an issue, but my app had several ViewControllers. Each time I left the GameViewController and returned, it would run this code again, creating a new GameScene each time. The old scenes were not being destroyed, so this created a large memory leak on an iPad Mini with iOS7 (about 20% CPU increase each time the GameScene started) that would crash the app after a few games.

The solution is simple:

- (void) viewDidDisappear:(BOOL)animated {
    [super viewDidDisappear:animated];
    SKView * skView = (SKView *)self.view;
    [skView presentScene:nil]; //remove everything from memory
}

This ensures that the GameScene is destroyed when you leave the GameViewController.

This solved most of my problems, but I still had a small memory leak. It wasn’t a big deal and I was tempted not to worry about it, but this game was going to be used in a tradeshow booth, which meant that it would be running for hours at a time. Under those conditions, even a small memory leak could be a big problem.

I was able to isolate the remaining issue to the fact that I set a protocol on my GameScene:

@protocol GameSceneDelegate 

@required
- (void) triggerGameOver;
@end

The parent GameViewController implemented the delegate to display a “Game Over” UIView. Even though I was destroying the GameScene, the delegate reference was still not being destroyed. It seems that SpriteKit classes are not reference counted in the same way as standard iOS classes (?). So, I replaced the protocol/delegate with an NSNotification that was sent by my SKScene and picked up by the parent ViewController. Decoupling the 2 classes fixed the memory leak and everything worked as expected.

Oddly, the memory leak only seemed to be an issue in iOS7. iOS8 worked fine. Maybe it was a bug that’s been fixed? As always, I hope maybe this helps prevent a bit of frustration for someone else.

iOS Game Development – Prototyping Part 1

Another post in my iOS game development series

I strained my back last weekend (I’m getting old), so I’m spending a lot of time sitting down these days, recuperating. On the bright side, I’ve had time to start prototyping the Bouncing Babies clone I’m building for iOS. You can see my progress below:

If you want to check out my code, you can clone the GIT repo. Here are a few notes about the prototype:

I don't have any "levels" in the game yet. So far, it just feeds you one "baby" (yellow ball) after another until you get bored. I was just trying to test out the bouncing and the controls. I will add escalating difficulty in the next week or two.

Since this is a prototype, the code has almost no comments and the structure is a bit of a mess. Prototyping is meant to be quick and dirty. The idea is to get a working demo as fast as possible and not worry about the architecture. This helps define what's involved in building the real game. Ideally, you should throw out the prototype when you're done with it.

You'll need a copy of the Flash CS5 IDE to compile the demo. I'm comfortable coding in Actionscript, so I can build faster in Flash than any other method. I decided to sacrifice open-sourciness for speed in this case. I put all of the code in Actionscript class files, so you can dig through the code without Flash CS5 if you wish.

Realism and simulation are often unnecessary. In this game, I want the bounces to be equal distances apart. If the bounces were realistic, they wouldn't be equally spaced. But, I can make it feel right just by carefully adjusting the height and speed of each bounce. The game won't actually model reality, but a user won't notice because it feels right.

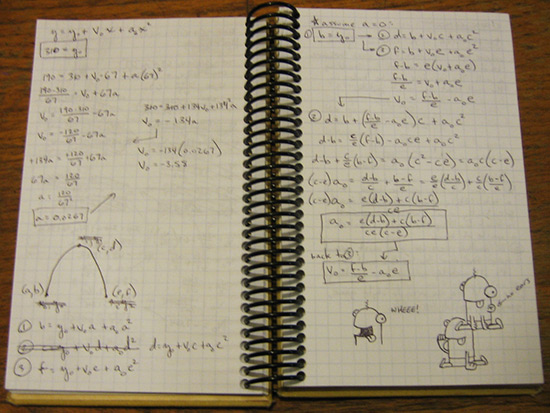
Along those lines, I wanted the bouncing on screen to look good. I know that the path of a ball flying through the air is given by a second-order (parabolic) equation:

y = Ax2 + Bx + C
So, I used this basic equation to specify each bounce. From linear algebra, I knew that I needed 3 equations to solve for my 3 unknowns (A, B, and C), which meant that I needed 3 points on each bounce. These were easily measured directly from the original game, but it takes about 5 minutes to do the algebra for each curve. There are 4 curves. What if I decided later that I wanted to tweak the height or width of the curves? So, I spent a little longer solving the equations with a set of hypothetical points: (a,b), (c,d), (e,f) and used them to create a helper file in Flash. It's in the GIT repo as arcmaker.fla. I can input any 3 points and it will calculate A, B, and C for me. It also draws the graph on top of a screenshot of the original game so I can see it. Last, it spits out some text that I can copy-paste into my game actionscript files. I probably spent a little over an hour on this. I used to resist coding helper scripts and level editors, thinking that it would be a waste of time, but it almost always pays off. If you think a helper script might be useful, go ahead and make it.

Another way of making the game feel right is to speed up the ball a bit on each bounce. When the ball moves at a constant horizontal speed, it actually feels like it's slowing down (because my bounce paths are too wide). I use a multiplier to speed up the ball a bit on each bounce. I created another helper for fine-tuning this. If you right-click on the Flash demo above and choose "Show Testing Console", you can change this multiplier. I have it set at a value that feels okay to me. a value of 1 will not change the speed at all - try it and you'll observe the "slowing down" effect. a value of 2 will double the speed on each bounce, 3 will triple it, etc. After updating the multiplier, right-click on the screen again and choose "Hide Testing Console" to play the game with the new speed settings. Tweak the multiplier value until the game feels right. It's amazing how such a small thing can make a huge difference in how the game feels. Again, this is another one of those helpers that is worth the time to code because I can quickly try different values and see what feels right.

The prototype is coming along nicely. I just have to code in my levels to ramp up the difficulty. Then, I can start figuring out how to port the game to iOS.

In case you missed it, the GIT repo is here. Clone it and you can follow my progress as I continue working.

...And you thought you'd never use algebra in "real life":

game design - who says you'll never need algebra

Yes, smarty pants, I know I could have solved the equations more easily with matrices, but my matrix algebra is super rusty, so I did it old-school.


Creating Bouncing Babies for iOS – Game Design Analysis

Another post in my iOS game development series

Before I try to recreate Bouncing Babies for iOS, I thought I should take the time to do an analysis of the gameplay. This could prevent some wasted time during development.

First, I want to point out that the original game fits the definition of a Classic Arcade Game:

  • Single Screen Play
  • Infinite Play
  • Multiple Lives
  • Scoring and High scores
  • Easy-to-learn, simple gameplay
  • No story

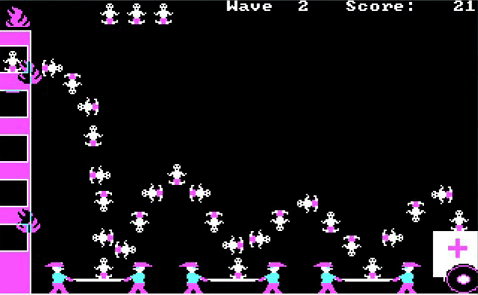
The original game was shareware back in the DOS days (pre-Windows). I knew that the game didn’t use a physics engine (not even remotely possible with the computing power back then), but I wanted to get a good look at how it worked, so I pinched a gameplay video from YouTube and combined all of the possible frames into a single image:

bouncing babies game design analysis

The image shows all of the possible positions for the babies and the player firefighters. Note how the babies can actually occupy only a handful of positions. Even when you have multiple babies on screen at the same time, they can only be in these distinct positions. The speed of the babies can be slowed down by simply repeating frames.

The gameplay is simple. You control a pair of firefighters who must bounce the babies to safety. As you can see in the image above, the firefighters have only 3 distinct positions. There are 2 control schemes:

  • the left and right arrow keys.
  • the 1, 2, and 3 keys.

Either way, I thought it would be an ideal game for converting to touchscreen control. The firefighters respond to the controls with no latency – as soon as you hit the key control, your players jump to the corresponding position. This seems obvious, but note that it is unlike breakout or pong, where the player can place their paddle in almost any position and the challenge is getting to the correct spot in time. Bouncing Babies is much simpler. The challenge is simply to hit the correct key at the correct time.

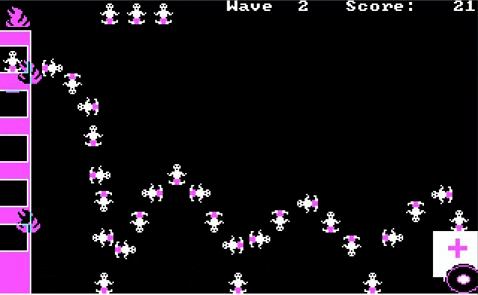
Here is another image showing the positions of the babies when they hit the ground:

bouncing babies game design analysis 2

There is no collision detection system in the game. As you can see from the second image, when a baby reached the low point of it’s bounce, the player firefighters had to be in place to bounce it. If not, the baby went splat. Again, the game is all about timing. When the baby was just about to hit the ground, the game checked if the player was in place to bounce it. If yes, bounce the baby. If no, the baby hits the ground.

One interesting thing I noted when I created the images above – the third bounce arc is smaller than the second. It doesn’t just look smaller – there are fewer baby positions in the third arc than the second. This means that it takes less time for the baby to fly through the third arc. This makes the timing more complex than it would be if the second and third arc were identical.

I’ll be making some tweaks to the game design, but I don’t plan to make any changes to the actual gameplay – just the way that the code works. Stay tuned for more.

Don’t forget, you can follow my agonizingly slow progress on the github repo:
https://github.com/wastedpotential/bouncing-babies
I’ve added the images from this post to the SOURCE folder in the repository.

Page 1 of 2

Powered by WordPress & Theme by Anders Norén