We're not part of the solution

Category: Uncategorized Page 4 of 9

SOLVED: IntelliJ IDEA LESS compiler failure

intellij Idea less compiler failI use IntelliJ IDEA for all of my web development work – it’s simply the best web IDE on the market, but I ran into a weird problem with the built-in LESS compiler recently. I cloned a project from the Github repo and set it up in IntelliJ. Everything was going well until I tried to compile the LESS files. I was getting weird errors whenever I tried to compile any LESS files in the project. Errors like this:

LESS CSS Compiler Error
mobile.less: Name Error: variable @screen-sm-max is undefined (line 2, column 20) near @media (max-width: @screen-sm-max) {

(This is weird because this variable is defined correctly)

or this:

LESS CSS Compiler Error
styles.less: org.mozilla.javascript.UniqueTag@15923b2d: NOT_FOUND Error: java.io.IOException: No such file file:/Users/admin/Desktop/_CLIENTS/Website%20build/BUILD/GIT/_WEB/styles/bootstrap/bootstrap.less (line -1, column -1)

(This is weird because it’s failing to compile Bootstrap, which I know is fine)

There was obviously something wrong with my setup because it worked fine for other developers. I was getting these errors when I used the “Compile to CSS” function or when I set up a LESS file watcher. I upgraded my LESS version. I spent a lot of time trying a lot of different things until I stumbled across this obscure thread.

That’s right. You can’t have any whitespace in the file path. My mistake was that the project was located in this folder:
Desktop/_CLIENTS/Website build/BUILD/GIT
Notice the space in “Website build.” I changed to folder name to “Website_build” and it worked. Note that manually adding “%20” into the file watcher path doesn’t work – you absolutely can NOT have any spaces in the path. I was kind of shocked at this problem. I thought we had gotten over this issue 20 years ago. Anyway, I’ve learned my lesson. No more folders with whitespace in the names. If this saves someone else a little time, then my wasted time will be worth something.

iOS: Limiting the character count on UITextField

For some reason, I couldn’t find this anywhere else on the web, so here it is. To set a maximum character count on a UITextField, simply implement this UITextFieldDelegate method:

-(BOOL) textField:(UITextField *)textField shouldChangeCharactersInRange:(NSRange)range replacementString:(NSString *)string {
    int maxLength = 64;
    //you only need this check if you have more than one textfield on the view:
    if (textField == self.nameTextField) {
        if (textField.text.length - range.length + string.length > maxLength) {
            if (string.length > 1) { // only show popup if cut-and-pasting:
                NSString *message = [NSString stringWithFormat:@"That name is too long. Keep it under %d characters.", maxLength];
                UIAlertView *alert = [[UIAlertView alloc] initWithTitle:@"Oops!"
                                                                message:message
                                                               delegate:nil
                                                      cancelButtonTitle:@"OK"
                                                      otherButtonTitles:nil];
                [alert show];
            }
            return NO;
        }
    }
    return YES;
}

Remember, this is a delegate method, so you have to specify that your UIViewController implements it:

@interface SomeViewController () <UITextFieldDelegate>

…and you have to set the delegate for the textfield:

self.nameTextField.delegate = self;

This can also be done for a UITextView with its delegate method:

-(BOOL) textView:(UITextField *)textView shouldChangeTextInRange:(NSRange)range replacementString:(NSString *)text {
    int maxLength = 64;
    //you only need this check if you have more than one textview on the view:
    if (textView == self.descriptionTextView) {
        if (textView.text.length - range.length + text.length > maxLength) {
            if (text.length > 1) { // only show popup if cut-and-pasting:
                NSString *message = [NSString stringWithFormat:@"That description is too long. Keep it under %d characters.", maxLength];
                UIAlertView *alert = [[UIAlertView alloc] initWithTitle:@"Oops!"
                                                                message:message
                                                               delegate:nil
                                                      cancelButtonTitle:@"OK"
                                                      otherButtonTitles:nil];
                [alert show];
            }
            return NO;
        }
    }
    return YES;
}

Game Design – Cards vs. dice vs. a spinner

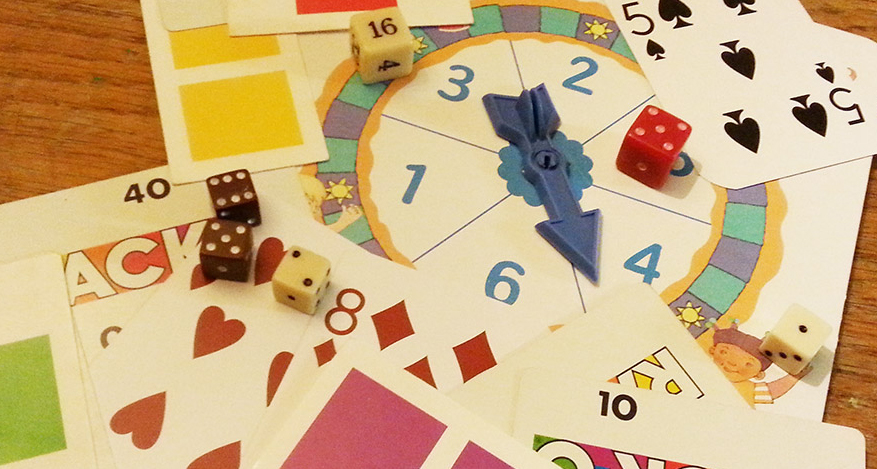
dice vs. spinner vs. cards
I just spent 14 hours driving back from my family’s beach vacation. While I was in the car, I was contemplating the design of a game that makes picking up toys more fun for my daughters. As I started fleshing out the idea, I was talking about it with Tonya (my wife). In my head, I had designed the game with cards, but she asked me if it could be a spinner or dice. My instant reaction was “well, of course not. It uses cards.” So, we started talking about why I prefer cards over dice or a spinner…

At first, it seemed like a simple internal prejudice I have. Spinners and dice are for baby games. Cards are for serious games. Obviously, this is a sweeping generalization and isn’t true in every case. Candyland uses cards. Role playing games often use dice. As we talked more, there were clearly deeper reasons for why I like card based games.

All three options provide a way to introduce some randomness into a game. Dice and spinners are basically interchangeable random number generators, but cards are not. Cards can be used the same way (a la Candyland), but they can also be used in much more complex ways. Think of all the games that can be played with a single deck of playing cards. It would be hard to come up with that many variations for a spinner or dice.

If I need a random number generator, I prefer dice over the spinner. There is something about the cheap cardboard spinners that are included in most games that feels unfair. If I roll a die 3 times in a row and get the same value on every roll, I think “Wow, that was weird.” But, if I spin a spinner 3 times in a row and always get the same results, I think “This cheap spinner sucks.” The spinner feels unfair. I don’t know if spinners really are unfair, but it’s never a good idea to design a game that feels unfair to players. As with all rules, there are exceptions: The Game of Life has a great spinner.

Speaking of game feel, cards feel more integral to the play (and in most cases they are). The dice and the spinner are both activities that essentially pause the gameplay in order to generate a random value. Because the dice and the spinner could easily be swapped with each other, or a digital random number generator, or some other device, they aren’t really integral to the game. In the case of card games, you generally aren’t pausing the gameplay to get a card. The cards are the gameplay. It’s a hard concept to describe, but cards make the gameplay more fluid, if used correctly.

I also think that the dice and the spinner are less satisfying because players are constantly being reminded of the concrete probability of getting a desired result. If a player rolls a single die, the probability of rolling a specific number is 1 in 6. If you have a spinner with 10 pie slices, your probability (theoretically) is 1 in 10. Players are subconsciously reminded of this every time they roll a die or spin a spinner. Cards abstract the probability…
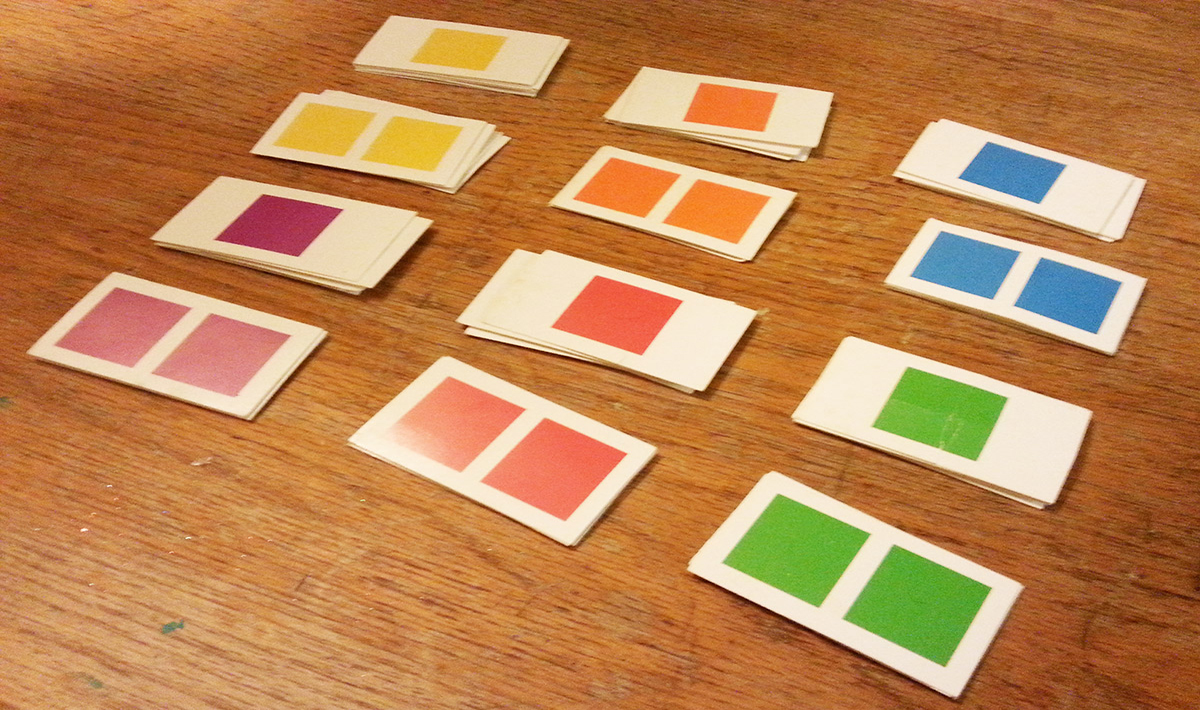
candyland cards
Going back to Candyland (probably the simplest use case for cards), there are 6 different colors. For each color, there are 6 single square cards and 4 double square cards. Ignoring the wildcards for the moment, what is the probability of drawing a double yellow? The math is not as simple as the 1 in 6 probability you get from a die. In a single turn, a player probably has a desired outcome in their head: they want to roll a three or draw an ace from the deck. The naked probability of dice and spinners is somehow more disappointing to players when they don’t get the desired outcome. Since cards hide their probability, a bad draw feels less disappointing and is just “the luck of the draw.”

Ultimately, I really want to use cards for my game design because I think they offer deeper gameplay possibilities. Additionally, I can easily throw out cards that aren’t working or add new ones to the deck as I refine my prototype. But it was interesting to think about why I prefer one basic game mechanic over another.

Create an iOS app without storyboards in XCode 5

XCode 5 doesn’t allow you to start a project without a storyboard, but storyboards are not appropriate for every project. Storyboards may not be a good fit for large apps or projects with multiple developers collaborating through Git or SVN. Luckily, there is a simple way to set up a project to use Nib files instead:

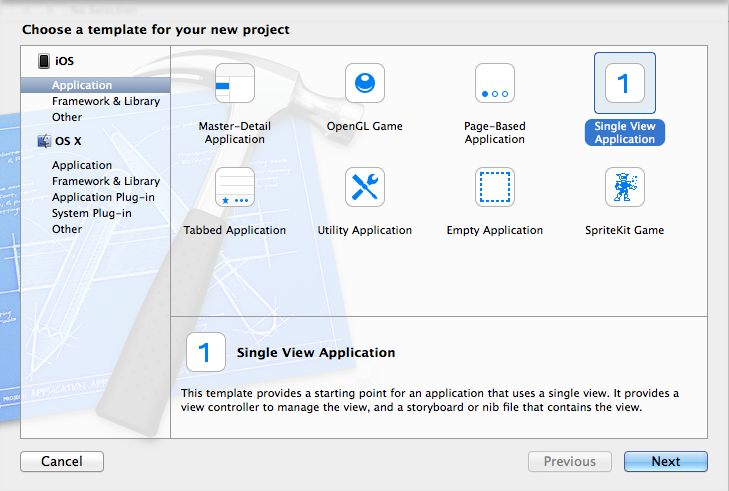
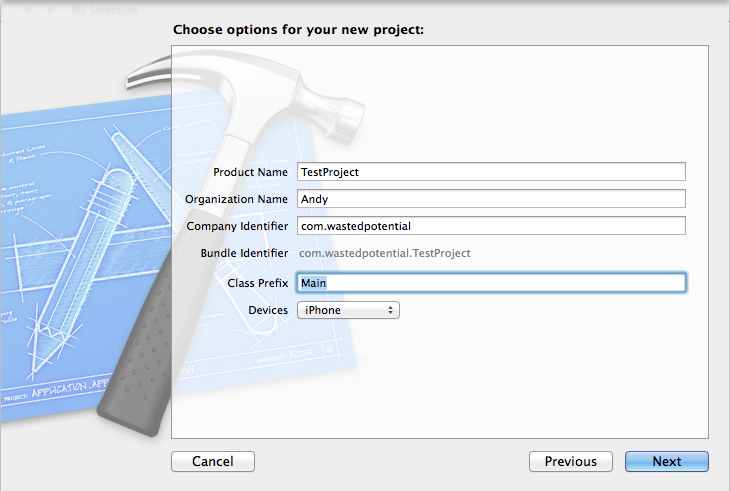
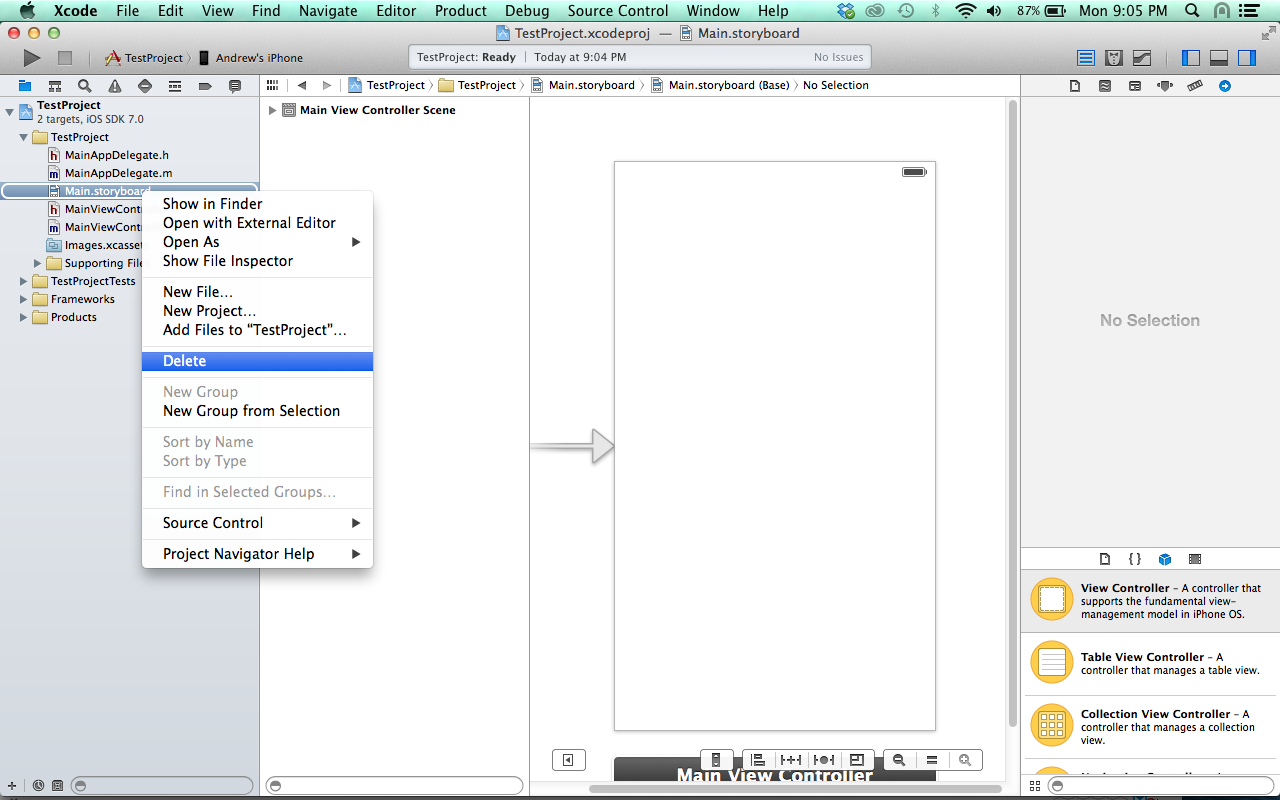
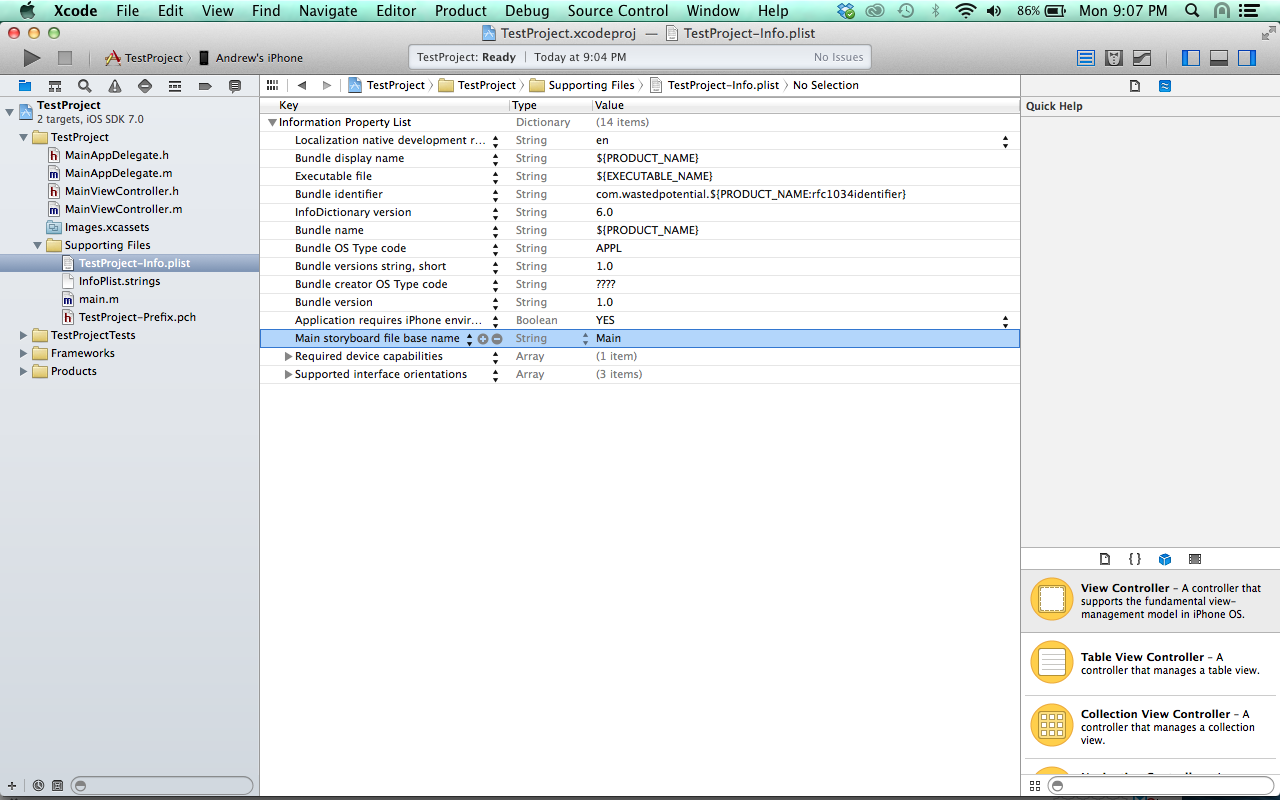
*** Click on the images below to view a larger version ***

  1. Create a new project with a Single View Application template xcode creat a new project
  2. Fill in the project name, identifier, etc and save it. xcode new project setup
  3. In the project navigator, delete the storyboard file. Choose “Move to Trash” in the dialog box. xcode delete the storyboard
  4. In the project navigator, open the Supporting Files folder and click on your project plist file to open it. Remove the “Main storyboard file base name” by clicking the minus icon on that row of the plist. If this entry is missing, then you don’t need to do anything. xcode remove storyboard reference from plist
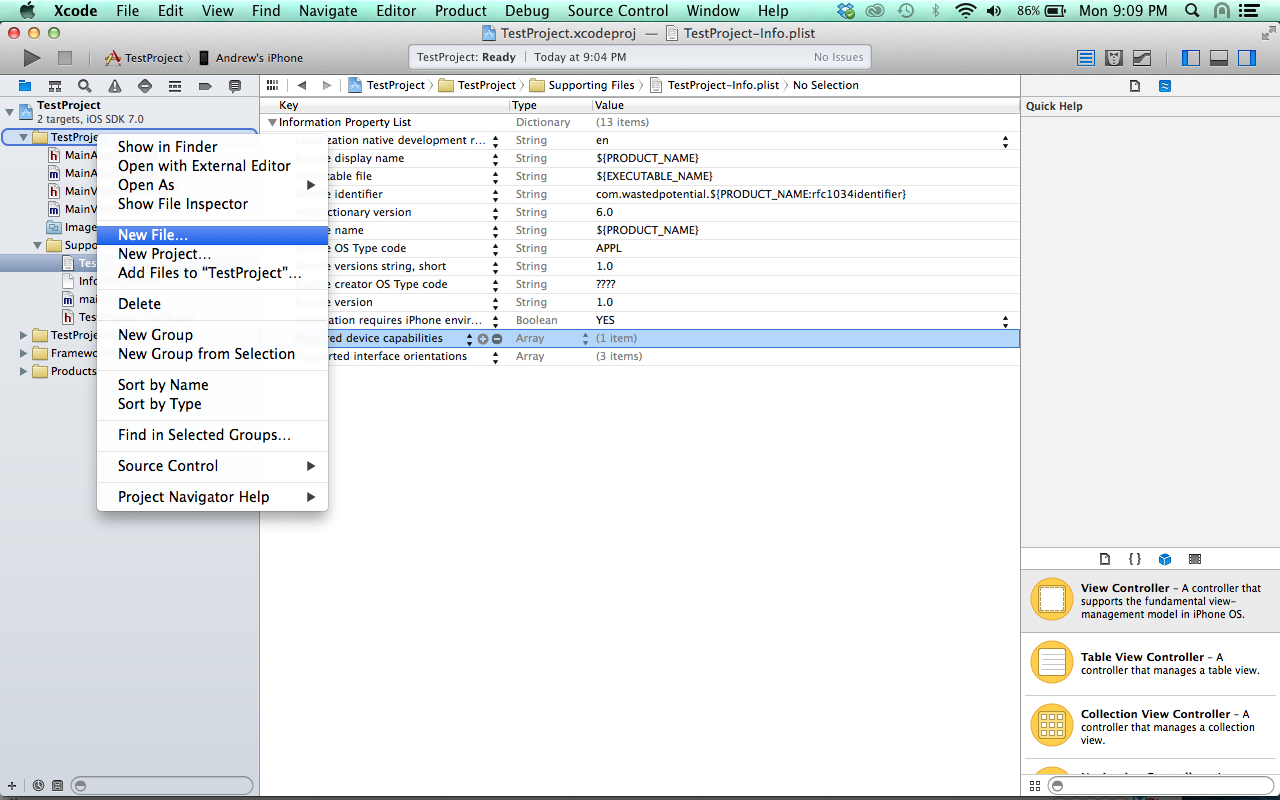
  5. In the project navigator, right-click the main project folder and choose “New File…” xcode new file
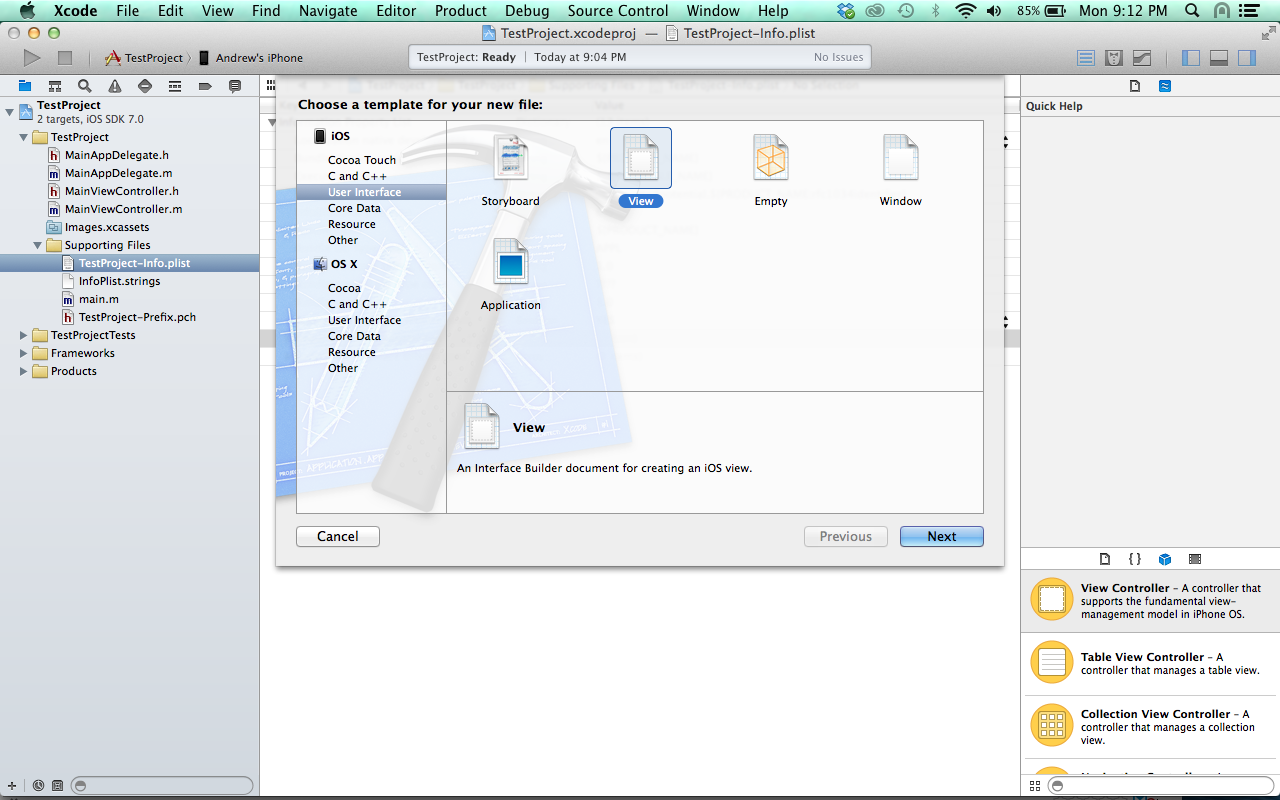
  6. select ios > User Interface and choose a View template. xcode add a nib xib file
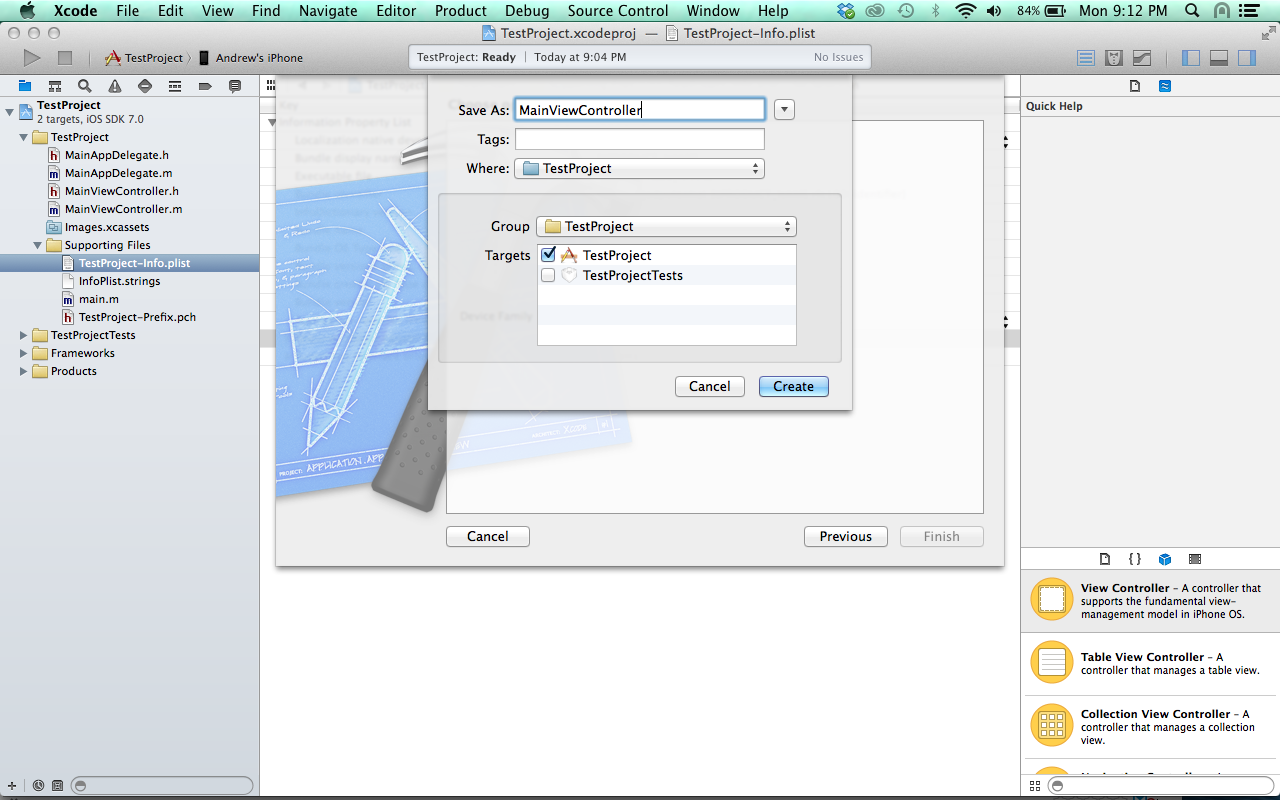
  7. Give it the same name as your main view controller and click “Create” xcode name your new nib file
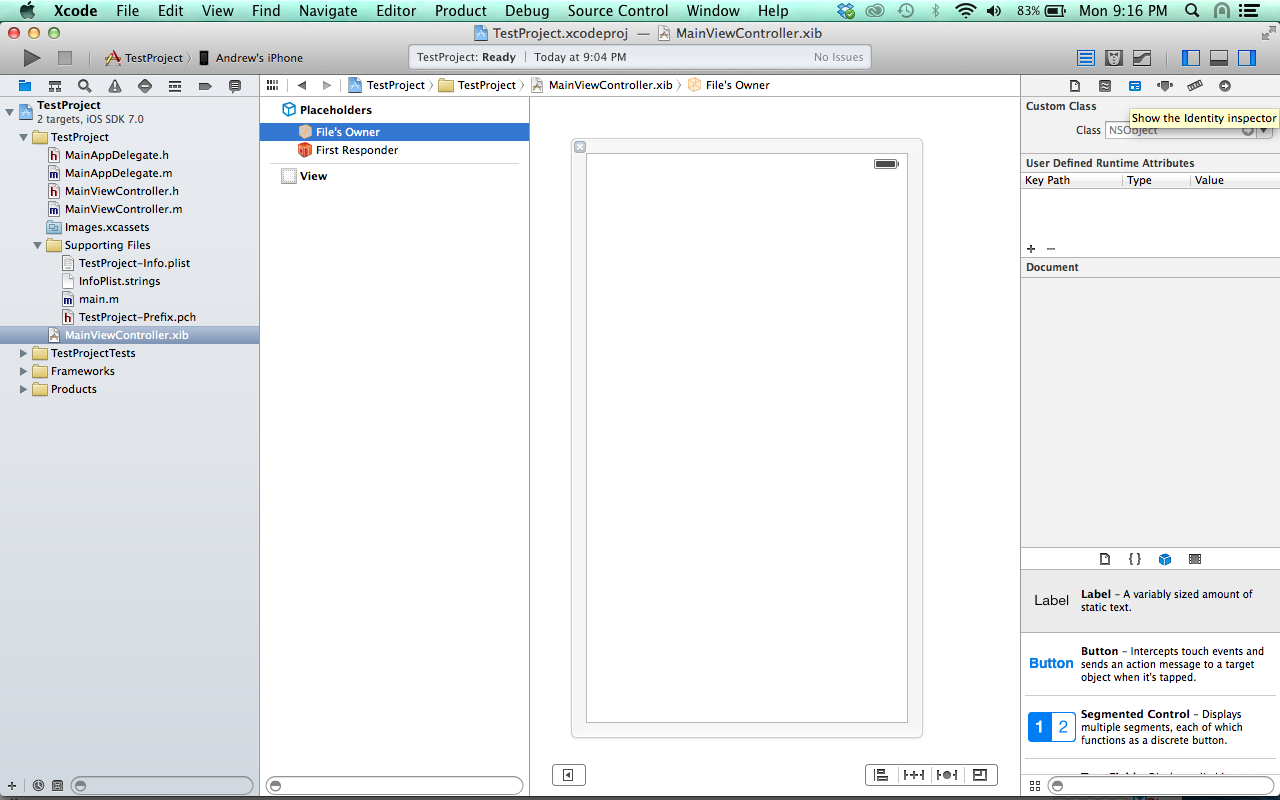
  8. open the new NIB file and click on File’s Owner in the document outline. xcode connect files owner
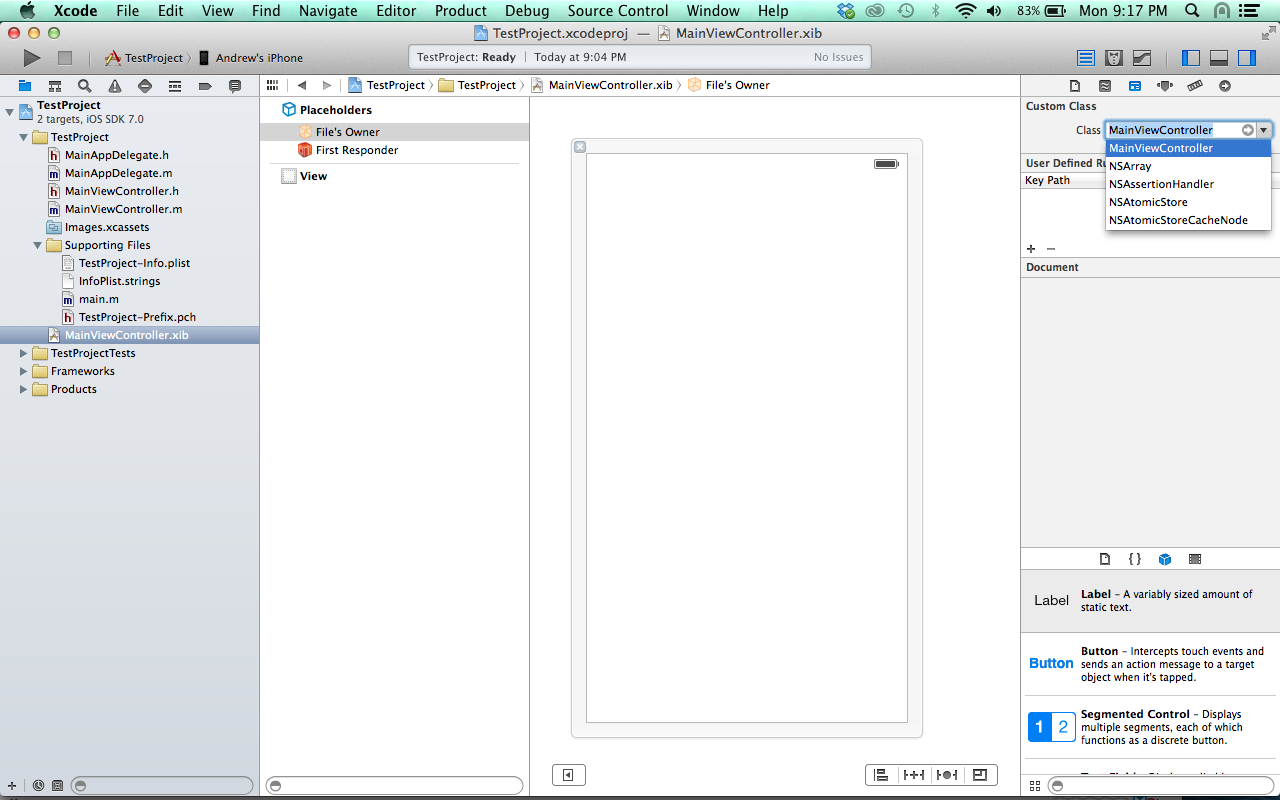
  9. in the Utilities panel on the right, choose the Identity Inspector and select your ViewController class in the dropdown list. xcode set the class for the nib files owner
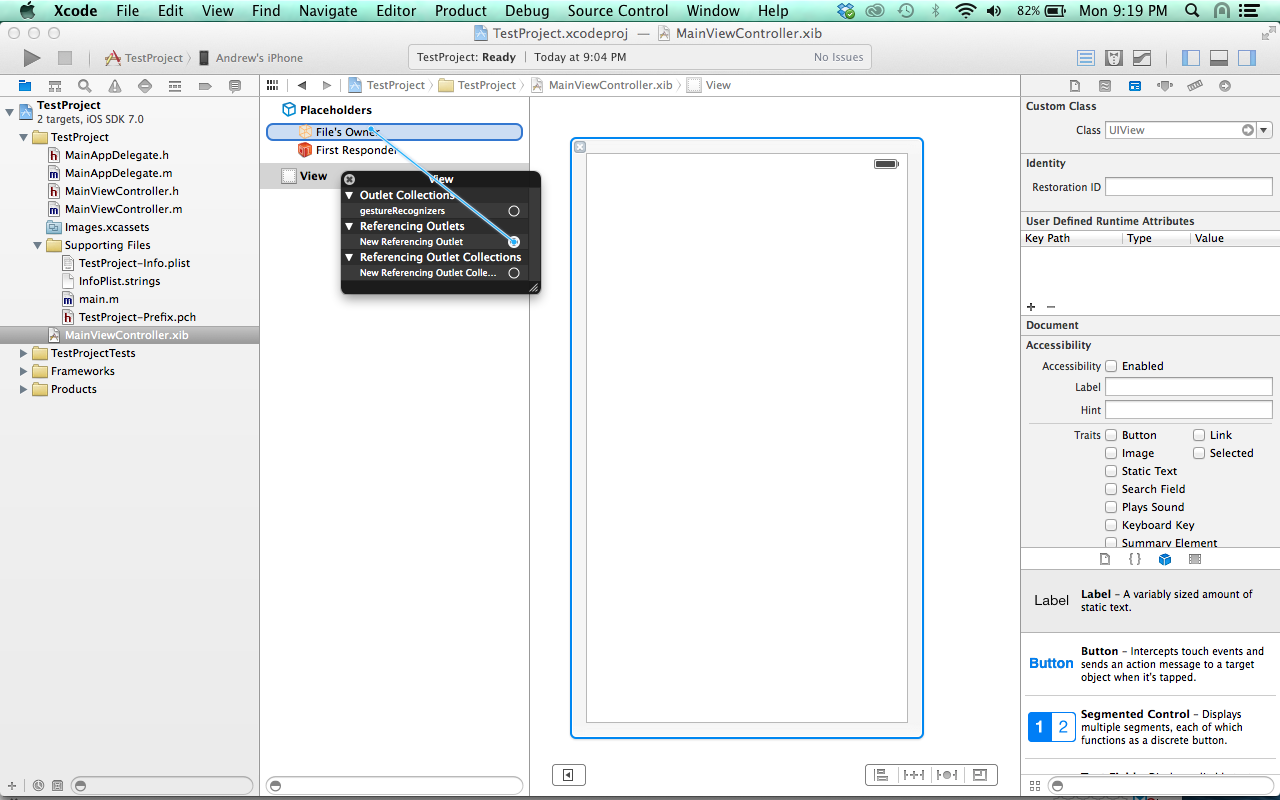
  10. Right-click the root view in the document outline to open the Connections popup. Then click and drag from the New Referencing Outlet to the File’s Owner. Another popup will appear. Click on the word “view.” xcode connect the root view of your nib file to the files owner
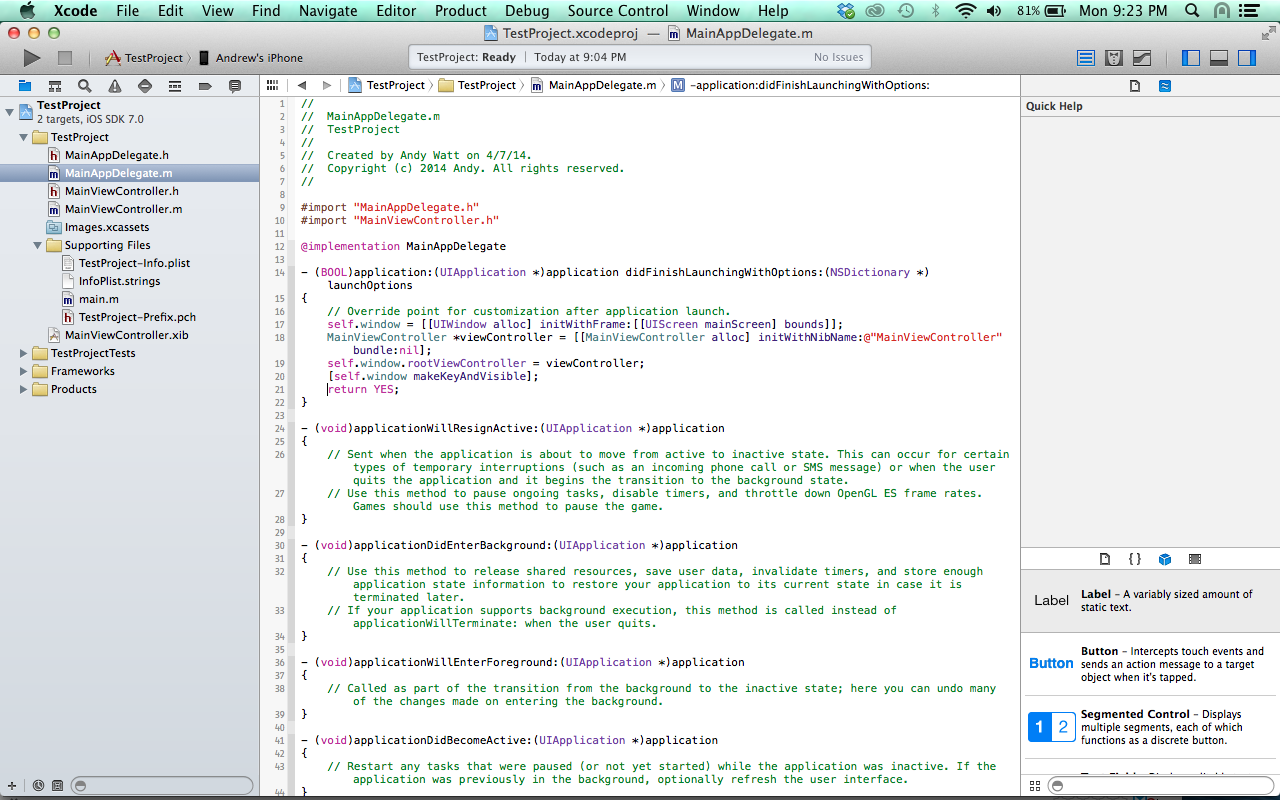
  11. Finally, update the application:didFinishLaunchingWithOptions: method with this code:
    - (BOOL)application:(UIApplication *)application didFinishLaunchingWithOptions:(NSDictionary *)launchOptions {
        // Override point for customization after application launch.
        self.window = [[UIWindow alloc] initWithFrame:[[UIScreen mainScreen] bounds]];
        MainViewController *viewController = [[MainViewController alloc] initWithNibName:@"MainViewController" bundle:nil];
        self.window.rootViewController = viewController;
        [self.window makeKeyAndVisible];
        return YES;
    }

    xcode add code to launch view controller with nib in app delegate

Now, build your project and run it. Voila! you’re done! I mostly grabbed these instructions from this link, but added some more detail and screenshots for those of us who are not Xcode experts. Happy Coding!

Page 4 of 9

Powered by WordPress & Theme by Anders Norén