We're not part of the solution

Category: Android

Fix for Cordova error: Android target: not installed cmd: Command failed with exit code 1

I was trying to set up Cordova on my windows laptop this weekend. I followed all of the setup steps and ran

cordova requirements

but got this error:

Android target: not installed
avdmanager: Command failed with exit code 1 Error output: Exception in thread “main” java.lang.NoClassDefFoundError: javax/xml/bind/annotation/XmlSchema at com.android.repository.api.SchemaModule$SchemaModuleVersion.(SchemaModule.java:156) at com.android.repository.api.SchemaModule.(SchemaModule.java:75) at com.android.sdklib.repository.AndroidSdkHandler.(AndroidSdkHandler.java:81) at com.android.sdklib.tool.AvdManagerCli.run(AvdManagerCli.java:213) at com.android.sdklib.tool.AvdManagerCli.main(AvdManagerCli.java:200) Caused by: java.lang.ClassNotFoundException: javax.xml.bind.annotation.XmlSchema at java.base/jdk.internal.loader.BuiltinClassLoader.loadClass(BuiltinClassLoader.java:582) at java.base/jdk.internal.loader.ClassLoaders$AppClassLoader.loadClass(ClassLoaders.java:185) at java.base/java.lang.ClassLoader.loadClass(ClassLoader.java:496)

A quick google search turned up lots of ideas for fixing the issue, including:

  • Downgrading to JDK 8 (Don’t do this – it’s outdated advice)
  • setting the environment and PATH variables (I did that already)
  • reinstall the JDK (I tried this – no luck)
  • create an AVD (This needs to be done, but still didn’t solve my issue)

Here’s a link to a helpful Stack Overflow thread that goes through some of these options.

I work on a Macbook for my job and I’m not too familiar with Windows dev tools setup. I spent hours trying to sort this out. Then I realized that Windows has TWO places to set environment variables: One for USER variables and one for SYSTEM variables:
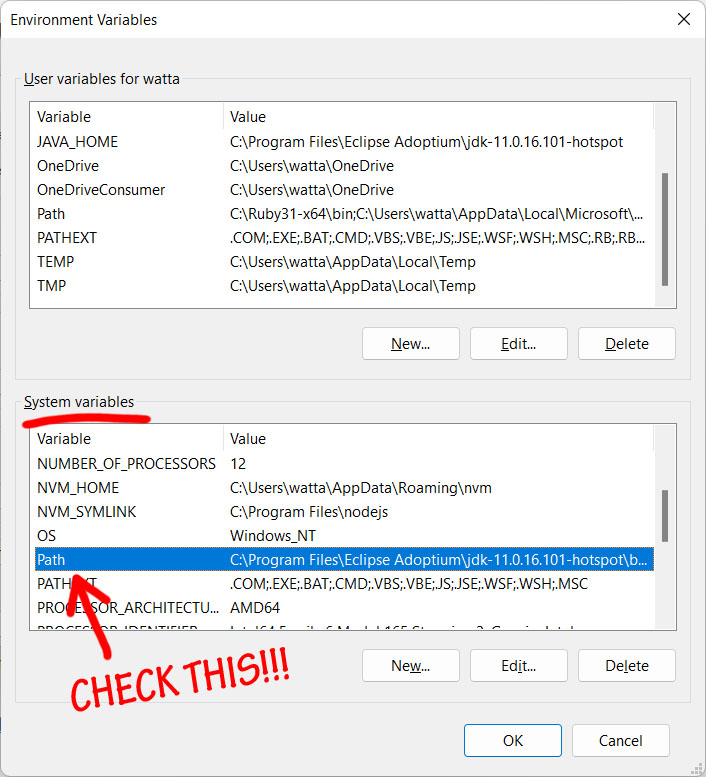
So, I started going through the system variables. When I opened up the system Path variable, I saw my problem:
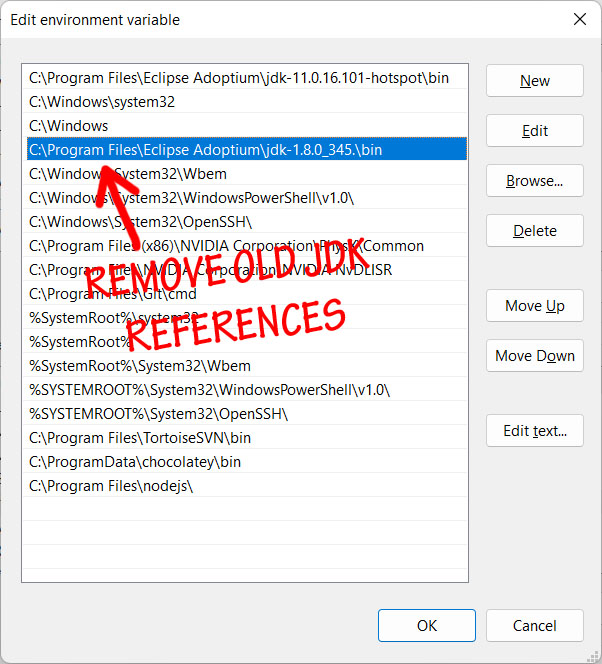
The JDK path was declared multiple times in the system variables. The image above is just an example – I actually had FOUR different JDK paths declared in my system path! Most of these paths pointed to non-existent JDKs. I removed all of the bad JDK paths, leaving only the path to the JDK I had just installed. Presto! My error went away!

Cordova requirements now threw a new error about not being able find ANDROID_SDK_ROOT, but that’s an easy fix. Just add a new User Environment variable called ANDROID_SDK_ROOT and give it the same value that you should already have for ANDROID_HOME.

As always, I hope that this saves you a little time and you won’t spend hours tracking down this issue like I did.


Kenny Login is Available Now!

Kenny Login version 1.0.0 releasedAfter months of procrastination and delays, I’m proud to officially release Kenny Login – a fully responsive HTML5 theme for your WordPress Login page. Version 1.0.0 is available now as a free WordPress plugin. Simply install the plugin and activate it through your admin panel. Blam! Kenny Loggins all up in your login page! Click here to get the lowdown.

Log in to the Danger Zone!

Image naming conventions for iOS and Android apps

Having a basic naming convention for the images in your mobile app can make your asset library a lot easier to manage. After working on some iOS and Android apps, I’ve come up with a method I think works pretty well. The basic rules are pretty simple:

  1. All image names should use only lowercase letters, numbers and underscores, like this:
    some_image_name.png
    another_one.png

    Do not use uppercase letters or special characters (Android doesn’t allow them anyway). The obvious exception here is that iOS retina display images will be have “@2x” appended to the name:

    basic_icon.png
    basic_icon@2x.png
  2. Do not put images in subfolders. If you use iOS xcasset libraries, use only ONE xcasset library for images. There are several reasons for this:
    • In Android, subfolders aren’t allowed for images
    • All of your images can be found in a single location, so nothing is hiding
    • It prevents accidentally giving the same name to 2 different images, which can cause all sorts of problems.
  3. Name all images by category like this:
    category_subcategory_imagename.png

    or you might think of it like this:

    folder_subfolder_imagename.png

    You still get the organization of folders without needing to use folders (which isn’t allowed in Android anyway). The other benefit is that images are grouped together alphabetically:

    home_header.png
    home_next_arrow.png
    home_prev_arrow.png
    login_label_user.png

    which is especially handy when using XCode’s Interface Builder for your layouts in iOS. The dropdown menu for images can get pretty long, so having them organized alphabetically by section makes it a lot easier to deal with.
    I tend to make the first word in the image name match the name of the app section (home, login). In cases where I need an image in multiple places, I create general category names like this:

    button_back.png
    button_next.png
    icon_check.png
    icon_trash.png

    Note that this also prevents creating multiple versions of the same basic icons. When I need an icon, it’s easy for me to see whether or not it already exists in the assets.

  4. Create a category for images that you want to delete later. I often use screenshots of design layouts to help me layout my views in Android Studio or XCode’s Interface Builder. I name them:
    comp_home.png
    comp_login.png
    comp_registration_1.png
    comp_registration_2.png

    Later, when I’m packaging my app for release, I know that I can trash anything in the “comp” category and it won’t break the app (well, it SHOULDN’T break the app).

  5. Give placeholder assets their proper, final names and correct dimensions (when possible), but make the image obviously wrong. Some people like to add red “FPO” lettering to these images. I personally like to add magenta backgrounds to image assets that I need to replace. Either way, it’s a glaring visual reminder that says “FIX ME PLEASE!!!” Giving a placeholder image the correct name and dimensions makes it easy to drop in a new file to replace the placeholder without combing through the files to rename or resize anything.

Of course, the key to this system is making sure that all of the other developers on the project are also using these rules. If everyone does it, managing your assets can be a lot less painful.

Powered by WordPress & Theme by Anders Norén