We'll give you something to cry about

Author: Andy Page 10 of 18

Querying the wordpress database with $wpdb from PHP

I have been working with WordPress a lot lately and I really like it. I want to have 10,000 of it’s babies. I recently needed to access the database using the $wpdb class that is built in to wordpress, but my PHP file was not part of the wordpress core, so $wpdb wasn’t automatically available. It’s really useful for accessing info like the root URL of your site (stored in the wp_options table). If you are creating a plugin or custom feature and need access to the database, it can be hard to figure how to enable the $wpdb class in your PHP files. Luckily, the code is actually not that complicated. The first thing you have to do is include the necessary files at the top of your custom php file:

include_once '/wp-load.php';
//var_dump($wpdb);
//$wpdb is now accessible!

If you uncomment the var_dump line in the code above and run this php file, it should spit out a lot of information. If it doesn’t, then you aren’t including the wp-load.php file correctly. You must have WordPress 3.0 or higher installed and your PHP file must be installed somewhere in the same directory as WordPress. You can also use a relative path if you need to:

include_once '../../../wp-load.php';
//var_dump($wpdb);
//$wpdb is now accessible!

Just make sure you have your relative path correct. It may be different, depending on where your PHP file is located in your wordpress installation.

Now that you have the $wpdb class enabled, you can query the database. Going back to my example above, if you need to retrieve your site URL, you could add the following lines to the PHP file we just created:

$table_name = $wpdb->prefix . "options";
$sql = "SELECT option_value FROM ".$table_name." WHERE option_name = 'siteurl';";
$root_url = $wpdb->get_var($sql);

This uses the get_var() function of $wpdb to return a single item (your site url) from the wp_options table. Notice that on the first line, I also used the $wpdb->prefix property, which in almost all cases, will be “wp_”.

What if you wanted to run a mySQL query on a table? That’s simple too! just use the query() method of $wpdb. For example, we can insert values into a custom table that we created for a plugin:

$table_name = $wpdb->prefix . "my_custom_table";

$sql = "INSERT INTO ".$table_name." (
	        field_1,
                field_2
              ) VALUES (
                'some value',
                'some other value'
              )";
$result = $wpdb->query($sql) or die(mysql_error());
//do something with the result here

You can even do more complex things, like create the tables you need for a plugin. The following function runs a mySQL query to create a table for a plugin:

function create_my_custom_table() {
    global $wpdb;
    $table_name = $wpdb->prefix . "my_custom_table";
    global $my_custom_db_table_version;
    $installed_ver = get_option( "my_custom_db_table_version" );
    //Check if the table already exists and if the table is up to date, if not create it
    if($wpdb->get_var("SHOW TABLES LIKE '$table_name'") != $table_name || $installed_ver != $my_custom_db_table_version ) {
        $sql = "CREATE TABLE " . $table_name . " (
              id mediumint(9) NOT NULL AUTO_INCREMENT,
              field_1 varchar(100),
              field_2 varchar(100),
              UNIQUE KEY id (id)
            );";

        require_once(ABSPATH . 'wp-admin/includes/upgrade.php');
	dbDelta($sql);
        update_option( "my_custom_db_table_version", $my_custom_db_table_version );
    }
    //Add database table versions to options
    add_option("my_custom_db_table_version", $my_custom_db_table_version);
}

The code above is actually a function that will check the wp_options table for a field called “my_custom_db_table_version.” If it exists, it compares the value to a global variable $my_custom_db_table_version. If there is a newer version of the table or if the version can’t be found in the database, it creates/updates the custom table.

As with most things, wordpress makes it easier once you know the basic code. Good Luck!

Why does my javascript fail in Internet Explorer?

If you’re like me, you use Firefox or Chrome as your browser of choice for development. They’re both pretty web-standards compliant and they have nice developer tools. So, your javascript code is working perfectly and you test it in some other browsers…

It silently crashes in Internet Explorer! If you are using IE9, you hit F12 to look at the developer tools and track down the error, but it suddenly starts working perfectly! No Errors! You close the developer tools and it fails again. Huh?!

This is a common IE issue. Internet Explorer does not have a javascript console by default, so any calls made to the console will throw an error and crash the program. If you open the developer tools, then the console works and it stops throwing the errors. There are 2 basic solutions to this issue:

1) Comb through your code and remove all calls to the javascript console. Usually the problem is some random console.log() statement you added for debugging and forgot to remove.

2) The more elegant solution is to add some code that will stop the console from throwing errors in IE. Here is a snippet of code I often include at the top of my projects to fix the problem:

<script type="text/javascript">
  try {
    console //does the console exist?
  }
  catch(e) { //if not...
    console = {}; //create a console object for IE
    console.log = function() {}; //add a log method to the new console object
    //add other console methods here if you need them
  }
</script>

Note that this code only fixes console.log() calls. The javascript console has other methods that may need to be added to this script too. If you do some Googling around, you can probably find a nice little polyfill* that you can include in all of your projects that will take care of all the console functions.

*If you don’t know what a polyfill is, don’t feel bad. It’s basically a piece of code that inserts non-native functionality into javascript. In this case, the polyfill doesn’t actually do anything except prevent IE from throwing errors.

Disclaimer: there are some other javascript peculiarities to IE, so this may not be your problem, but ruling it out is a good place to start.

A Flixel platformer game with source code.

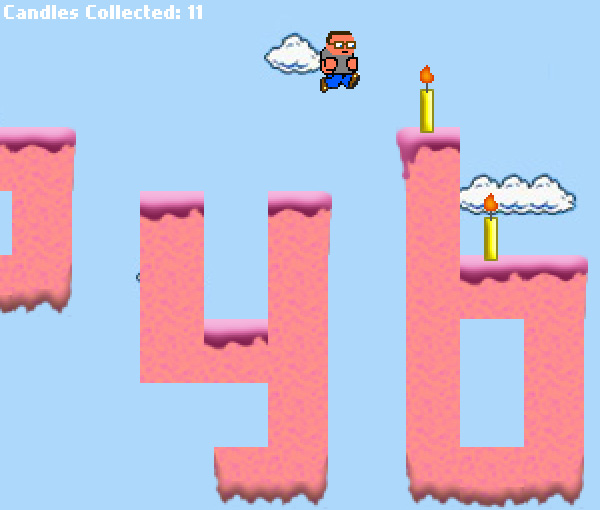
After my recent post about using Flashpunk to build a Flash game, I started working on a game project and quickly became frustrated with some of the shortcomings of Flashpunk. I found myself hacking the core Flashpunk engine so much that I thought I’d try Flixel and see if it worked better for me. I’m glad I did. Flixel has a lot of nice features built in that Flashpunk does not. After working with it a bit, I was able to hack together a small platformer in my free time over a few days. So, here are my thoughts on the Flixel and Flashpunk engines as well as the source code for my Flixel “game,” which is actually an interactive birthday card for my awesome wife.

First, click the image below to check out the Flixel game that I made last week (give it some time to load – there’s no preloader). You may need to click on the Flash stage to give the game focus.

I spent less than 15 hours on the whole thing and that includes coding the game, creating the artwork and even hand-coding the tilemap text file. The game has some issues, but I was rushing to get it done before my wife’s birthday and I’m pretty happy with how it turned out. Here are some things I would have changed if I had time:

  • Clean up the artwork. Most of the art was slapped together pretty quickly in photoshop and could use some serious polishing.
  • Add some sound effects
  • Optimize the graphics. Most of the screens use large bitmaps that should have been chopped up into smaller images.
  • Add a preloader

As for the eternal question of which is better Flixel or Flashpunk? Honestly, it’s a matter of personal preference, but I really prefer Flixel. If you want to build a basic platformer or top-down shooter, you could code the basic game in a day or two and spend more time building levels or creating graphics and sound. It just feels more fleshed out than Flashpunk to me.

My frustration at needing to hack the Flashpunk engine didn’t go away when I started using Flixel, however. The game that I’m trying to build requires me to hack the core of the Flixel engine too. The downside of Flixel is that the AS3 code in the Flixel engine is much more opaque than Flashpunk. Flashpunk’s code will be more familiar to most Actionscript developers, so it will feel more comfortable. In fact, I’m still working out some of the details of what I’m trying to do in Flixel and it is not as simple to tweak the Flixel engine as it was to modify Flashpunk.

As with Flashpunk, there aren’t many great tutorials for Flixel – the forums are very helpful.

Also like Flashpunk, Flixel has had a major revision at some point and a lot of the API was changed. If you are following a tutorial and the code isn’t working for you, it is probably for the older version of Flixel.

In case you missed it, you can download the source code for my Flixel game here. There is a lot of helpful code in there including how to set up scrolling, tilemaps, and collectibles. Feel free to take my code and build on it. I replaced the character sprite sheet because I want to use it again.

The music I used is “Many Happy Returns” by Tom7, used by permission. Click here to check out his other chiptunes – they’re great.

Augmented Reality Air Hockey – A Game Experiment

I was digging through some of my old files the other day and found this interesting game prototype from a few years ago, when Augmented Reality was the latest buzzword. I had seen some experiments with it, but I was curious to see if the AR Markers could be used as game controllers. Could you create a driving game where the AR Marker acted as the steering wheel? Or, could you even create multiplayer games that used multiple markers?

I started playing with the Transmote FlarManager and decided to try to create an air hockey simulation using 2 AR Markers and the APE physics engine for Flash. My game prototype can be seen in the video below.


This turned out to be a lot more challenging than I expected and I was pretty disappointed in the results. As you can see in the video, the performance of the Augmented Reality tracking is fairly weak. I also had to hack the physics engine quite a bit to get what I was looking for. Here’s the rundown of what I learned:

  • The Augmented reality tools are fairly clunky and require a lot of resources. That’s why most of the cool experiments you see use stationary AR Markers sitting on a tabletop. It’s too difficult to keep up with moving markers.
  • The Transmote FlarManager library tracks multiple markers, but it is not able to differentiate them. In other words, it can only tell that there are 2 markers on screen in my game. It can not tell which one is player 1 and which one is player 2. In this case, it really doesn’t matter. You score a point in air hockey when the puck lands in a goal – which player touched it last is unimportant. But, in many games, knowing which player acts on an object is crucial. I also tried the Squidder FLAR Actionscript library and had the same results.
  • APE (Actionscript Physics Engine) is a set of classes I have used before and I find it useful for simple physics-based games. The syntax makes a lot more sense than Box2D if you don’t know C++. But, for this game, I needed a Dragable Circle Particle, which is not a standard APE class. Luckily, someone smarter than me created one here. I adapted it and then created a FlarCircleParticle for my prototype.
  • This prototype has a lot of overhead. It uses the basic AR toolkit for Flash, the FlarManager, Papervision 3D, APE Physics, and more. So, on every frame, I’m capturing the webcam footage, trying to locate multiple AR Markers, using Papervision to calculate the positions of the players, and then running a physics simulation before drawing it to the screen. That’s a lot of work for Flash. For optimization, the Papervision probably needs to be removed and a 2D AR Marker locator needs to be created.

In essence, this experiment is a failure, which is why I never finished it. The FlarToolkit and FlarManager just aren’t capable of what I needed. I don’t consider it a waste of time, though. You need to be willing to take chances with game prototypes… and you need to be willing to give up on prototypes that just aren’t working. Very few great game ideas work perfectly on the first try, but an interesting failure can spawn a lot of great ideas.

If you want to try my prototype for yourself, download the markers and click here to test it out. The source code for this Prototype can be downloaded here. Feel free to take it and play with it. A word of warning: I built this several years ago and I hacked it together pretty quickly, so the code is a bit of a mess. If you are able to create anything cool with it, I’d love to know about it (and a shout out for wasted potential is always nice). Some links to resources you might need can be found below. Good Luck!

*Note that a lot of these actionscript libraries are no longer being maintained. They are the ones that I used when I originally built my prototype.

Page 10 of 18

Powered by WordPress & Theme by Anders Norén