wasted potential

We love you, but we're not IN love with you

iOS SpriteKit Memory Leaks

I was building a SpriteKit game at work the other day and ran into a couple of annoying issues that were causing memory leaks in my app. The first one was created when I set up the GameScene (an SKScene subclass) in my view controller:

- (void)viewDidLoad {
    [super viewDidLoad];
    SKView * skView = (SKView *)self.view;
    
    // Create and present the scene.
    GameScene * scene = [GameScene sceneWithSize:skView.bounds.size];
    scene.scaleMode = SKSceneScaleModeAspectFill;
    [skView presentScene:scene];
}

There’s one big problem with the code above: the view bounds haven’t been set in viewDidLoad. So, the GameScene size will probably be wrong. No problem, we’ll just move it to where we know the view bounds have been set:

- (void)viewWillLayoutSubviews {
    [super viewWillLayoutSubviews];
    SKView * skView = (SKView *)self.view;
    
    // Create and present the scene.
    GameScene * scene = [GameScene sceneWithSize:skView.bounds.size];
    scene.scaleMode = SKSceneScaleModeAspectFill;
    [skView presentScene:scene];
}

…except for one thing. Now, the GameScene gets recreated every time you come to the ViewController. If you are doing everything inside SpriteKit, then this isn’t an issue, but my app had several ViewControllers. Each time I left the GameViewController and returned, it would run this code again, creating a new GameScene each time. The old scenes were not being destroyed, so this created a large memory leak on an iPad Mini with iOS7 (about 20% CPU increase each time the GameScene started) that would crash the app after a few games.

The solution is simple:

- (void) viewDidDisappear:(BOOL)animated {
    [super viewDidDisappear:animated];
    SKView * skView = (SKView *)self.view;
    [skView presentScene:nil]; //remove everything from memory
}

This ensures that the GameScene is destroyed when you leave the GameViewController.

This solved most of my problems, but I still had a small memory leak. It wasn’t a big deal and I was tempted not to worry about it, but this game was going to be used in a tradeshow booth, which meant that it would be running for hours at a time. Under those conditions, even a small memory leak could be a big problem.

I was able to isolate the remaining issue to the fact that I set a protocol on my GameScene:

@protocol GameSceneDelegate 

@required
- (void) triggerGameOver;
@end

The parent GameViewController implemented the delegate to display a “Game Over” UIView. Even though I was destroying the GameScene, the delegate reference was still not being destroyed. It seems that SpriteKit classes are not reference counted in the same way as standard iOS classes (?). So, I replaced the protocol/delegate with an NSNotification that was sent by my SKScene and picked up by the parent ViewController. Decoupling the 2 classes fixed the memory leak and everything worked as expected.

Oddly, the memory leak only seemed to be an issue in iOS7. iOS8 worked fine. Maybe it was a bug that’s been fixed? As always, I hope maybe this helps prevent a bit of frustration for someone else.

SOLVED: Attributed Placeholder UITextField Bug in iOS7

I was creating some custom UI components for an iOS project the other day and I ran into a weird bug. I was subclassing UITextField so I could auto-style all the UITextViews throughout the app (Yes, I know that an iOS purist would tell me to create a UITextField category because overriding UI components is considered “bad,” but I don’t care). I was trying to change the color of the placeholder text in a UITextField using this code:

self.attributedPlaceholder = [[NSAttributedString alloc] initWithString:self.placeholder attributes:@{ NSForegroundColorAttributeName : [UIColor whiteColor] }];

This was working fine for a while, then it randomly started throwing compiler errors. Sometimes, it would compile. Other times, it would not. I commented out the code and moved on, but it was bugging me. After Googling around a little, I found a suggestion to add a check for iOS6, since attributed placeholder text only works in iOS7:

if ([self respondsToSelector:@selector(setAttributedPlaceholder:)]) {
    self.attributedPlaceholder = [[NSAttributedString alloc] initWithString:self.placeholder attributes:@{ NSForegroundColorAttributeName : [UIColor whiteColor] }];
} else {
    NSLog(@"Cannot set placeholder text's color, because deployment target is earlier than iOS 6.0");
    // TODO: Add fall-back code to set placeholder color.
}

My project target was iOS7 only, so this really shouldn’t have mattered, but it did. After adding the iOS6 check, the compiler errors stopped. I’m sure there is a logical explanation, like I’m allowing an old ARM architecture in my build settings or something.

The really strange part is that the code works perfectly – the placeholder text color gets set correctly every time in my iOS7 app. It just needs the version check for the compiler to play nice.

Converting SVN repos to Git (for dummies)

We used to use Subversion (SVN) for all of our source control at work a few years ago. Then, we switched over to Git a while back. I had several old projects still stored in our SVN account at codebasehq.com and I needed to migrate them to Git repos. A few of them were work projects that needed to be moved to Github. Others were personal projects that I wanted to store on BitBucket. I spent several hours combing through blog posts figuring this out, so I thought I’d make a “dummies” guide on how to do this for people like me who are not Git experts. For this conversion, you will need:

  • Sourcetree – a great, free Git GUI. Get it here
  • Git installed on the command line. Sourcetree has it’s own Git client, but we will need to do some command line stuff. Unfortunately, I can’t offer any tips on setting up Git. I did it several years ago and didn’t make any notes on it.
  • A mac. Sorry, but these instructions are for mac users. They will be very similar for PC users, but may need slight modification.

Once you have those things, here’s what you do:

  1. Create a folder on your machine where you will store your files during this process. I created one called “SVN_TO_GIT” on my desktop.
  2. Log in to your SVN account and find the SVN repo you want to convert. browse through the files and try to get a list of the user ids that have made commits. For example, in one of my work projects, I found the following user IDs:
    andytb9
    johnboy
    andy
    john
    toolbox
  3. Create an authors.txt file to convert the old svn IDs to git emails. This is really simple. Just save a blank text file in the folder you created above as “authors.txt”. In this file, add a line for each of the user IDs you found in Step 2. These lines specify how to convert the SVN user IDs:
    andy = Andy Watt <andy@gmail.com>
    andytb9 = Andy Watt <andy@gmail.com>
    johnboy = John Doe <john@gmail.com>
    john = John Doe <john@gmail.com>
    toolbox = Andy Watt <andy@gmail.com>

    **Note how you can actually re-map the project contributors. I could simply assign all SVN IDs to my email if I want.

  4. Create a subfolder in the SVN_TO_GIT folder you already created. This folder will hold the repo that you will convert, so name it something that makes sense. For this example, I will name mine “REPO_1”.
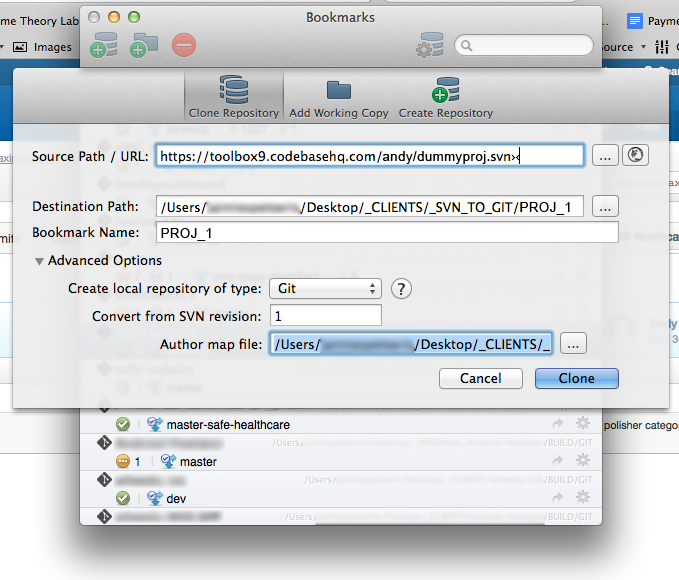
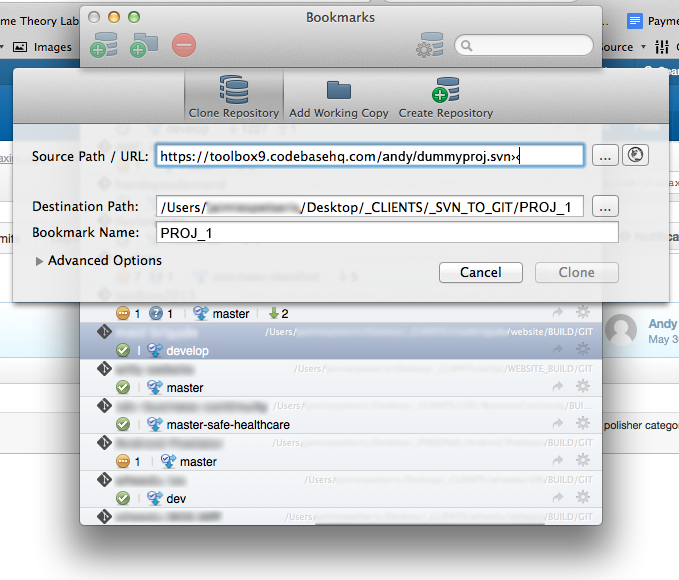
  5. Open Sourcetree and clone the SVN repo into the REPO_1 folder you created above. Clone it as if it was a Git repo, but enter the URL of the SVN repo. You will probably need to enter your user name and password for the SVN account here.svn-to-git-1-clone-svn
    Sourcetree will notice that it’s an SVN repo and ask you for some details on how to convert it:

    • Create local repository of type: Git
    • Convert from SVN revision: 1
    • Author map file: (browse to your authors.txt file)

    svn-to-git-2-options-svn
    BTW, after you enter your SVN credentials, make sure that Sourcetree is still planning to save your cloned repo into the REPO_1 folder. Sourcetree has a quirk that sometimes changes this destination folder unexpectedly.

  6. Click “clone”
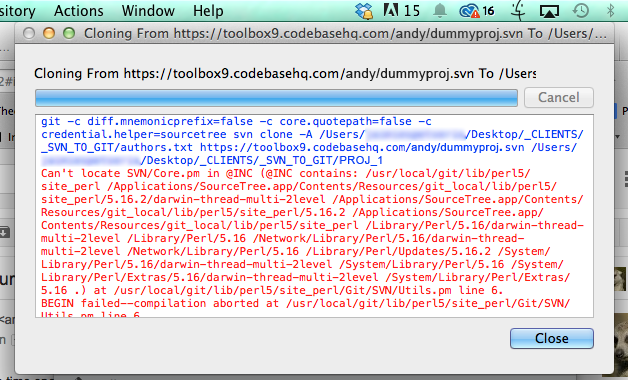
  7. If you get an error about “Can’t locate SVN/Core.pm”, go here and follow the instructions to get everything hooked up correctly.
    svn-to-git-3-cant-locate-core-svn
  8. Or… if you get a crazy error like this:
    Can't locate object method path via package Git::SVN at /usr/local/git/lib/perl5/site_perl/Git/SVN/Ra.pm line 338.
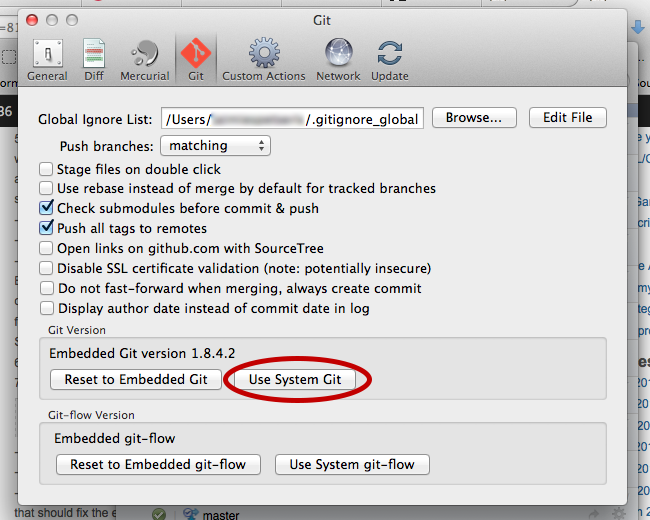
    • go to Sourcetree > Preferences.
    • click on the Git tab at the top.
    • near the bottom, change the Git version to “Use system Git”
    • locate the system Git executable file on your machine. You can do a search in finder for “git” and look for a file with that name – the icon will look like a terminal window.
    • that should fix the error

    svn-to-git-error-use-system-git

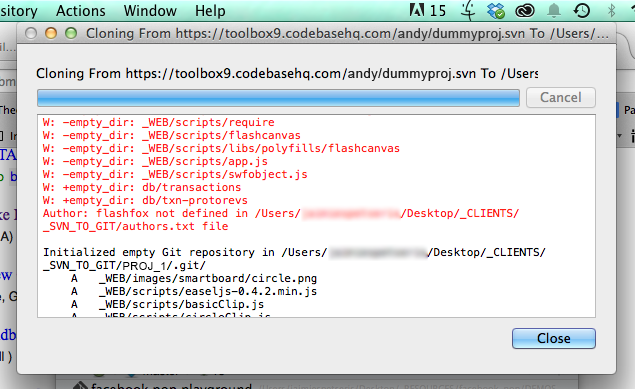
  9. Show the output and check for errors. If it clones successfully, you’re almost done! If not, you probably forgot a user in the authors.txt file. Scan the errors to see if it is bonking on a user id. Add the conversion to your authors.txt file and try again.
    svn-to-git-error-author-not-defined
  10. Log in to Github, Bitbucket, or the Git account of your choice. Create a new repo. Be sure to specify whether this is a public or private repo. I did not add a readme, but it’s ok if you do.
  11. Copy the url for the new Github repo that you created (in my example: https://github.com/andy/dummy-project.git)
  12. On your mac, open a terminal window
  13. cd (change directory) to the SVN_TO_GIT/REPO_1 folder that now contains your cloned repo.
  14. run the following commands:
    git remote set-url origin
    git remote set-url origin https://github.com/andy/dummy-project.git
    git push origin master
  15. Alternative method if the previous steps didn’t work for you:
    cd /path/to/my/repogit 
    remote add origin https://tb9andy@bitbucket.org/andy/dummy-project.git
    git push -u origin --all 
    git push -u origin --tags
  16. After it finishes, log in to github and take a look at your awesome new git repo with all of its commit history. Pat yourself on the back for your awesomeness.
  17. Create a new folder on your local machine and clone the new github repo into it. This is the local folder you should work from. Don’t work from the SVN_TO_GIT/REPO_1 folder you created. You should be able to delete that now.
  18. You should remove the old SVN remote and any local references to it on your machine once you’re sure that everything has converted correctly.

If you need to convert an old SVN repository to Git, I hope this will save you some time. If I missed anything, leave a comment and let me know.

A Brief Lesson in Email Spam

I received an urgent support ticket yesterday from a client’s hosting provider. It said that email spam was originating from our client’s website. It was the typical email that most people refer to as a “Nigerian email scam” or a “419 scam.” Here’s the email:

Dear Friend,

Greetings in the name of God,Please let this not sound strange to you
for my only surviving lawyer who would have done this died early this
year.

I prayed and got your email id from your country guestbook.I am Mrs Rose
Holtsbery from London,I am 58 years old,i am suffering from a long time
cancer of the lungs which also affected my brain, From all indication my
conditions is really deteriorating and it is quite obvious that,
according to my doctors they have advised me that i may not live for the
next two months,this is because the cancer stage has gotten to a very
bad stage.

I was brought up from a motherless babies home was married to my late
husband for twenty years without a child,my husband died in a fatal
motor accident Before his death we were true believers.Since his death I
decided not to re-marry,I sold all my inherited belongings and deposited
all the sum of 10million dollars with a Bank.

Presently, this money is still with the bank and the management just
wrote me to come forward and claim my money because they have kept it
for so long or rather issue a letter of authorization to somebody to
receive it on my behalf since I can not come over because of my illness,
or they get it confiscated.

Presently, I'm with my laptop in a hospital here in Switzerland where I
have been undergoing treatment for cancer of the lungs. My doctors have
told me that I have only a few months to live.It is my last wish to see
that this money is invested to any organization of your choice and
distributed each year among the charity organization,the poor and the
motherless babies home.

I want you as God fearing person, to also use this money to fund
church,mosque, orphanages and widows,I took this decision before i rest
in peace because my time will soon be up.

As soon as I receive your reply I shall give you the contact of my
Doctor Legal practioner(lawyer) who will issue you a letter of Authorit
y that will prove you as the new beneficiary of my fund.

Provide me with your information so i can send it to the bank as the new
beneficiary and issue you a letter of authorization.

Below is the information needed from you:<

FULL NAMES:__________SEX: _____ AGE: ______MARITAL
STATUS:_______________COUNTRY: ______
CONTACT ADDRESS: ________________________PHONE NO#___________FAX
NO#_________________OCCUPATION:______________

Please assure me that you will act accordingly as I stated herein.Hoping
to hear from you soon.

Mrs Rose Holtsbery

I had no idea where to begin solving this issue, so I called Rackspace, the hosting company. The support folks confirmed that the email was originating from the server and ran some diagnostics to locate the source. We quickly found the problem and I got an education in spamming…

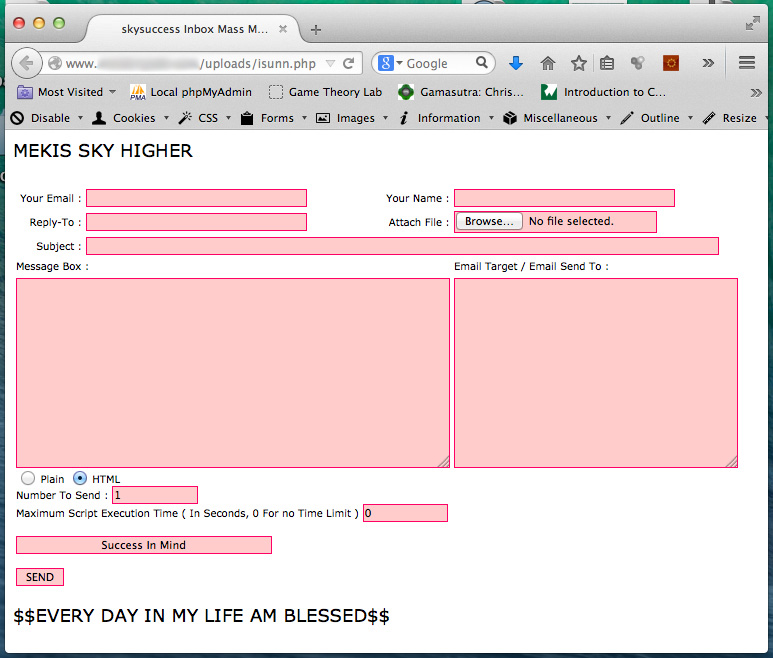
On the client’s website, there is a folder cleverly named “uploads,” which stores all images and documents uploaded through the content management system. Some lazy web developer (me) had set the permissions on the folder to 777. What this means is that basically anyone has read/write privileges on this folder. Scammers use bots (automated scripts) to crawl the web looking for open folders like this. When they find one, they attempt to write a simple PHP script into the folder. This script is the spam mailer, but it uses your server to do the dirty work. We found a script named “isunn.php” in the uploads folder. If you navigated to the file in your browser, it looked like this:

Click on the image to see a larger version:
spam-GUI

Pretty slick. It’s basically an email spam GUI. You simply enter the details, including the number of people you want to email and hit the SEND button. Easy peasy.

Anyway, I thought it was interesting to get a brief education in the mechanics of spamming. And the lesson is: don’t ever set folder permissions to 777 on your web server.

Page 3 of 18

Powered by WordPress & Theme by Anders Norén