We used to use Subversion (SVN) for all of our source control at work a few years ago. Then, we switched over to Git a while back. I had several old projects still stored in our SVN account at codebasehq.com and I needed to migrate them to Git repos. A few of them were work projects that needed to be moved to Github. Others were personal projects that I wanted to store on BitBucket. I spent several hours combing through blog posts figuring this out, so I thought I’d make a “dummies” guide on how to do this for people like me who are not Git experts. For this conversion, you will need:
- Sourcetree – a great, free Git GUI. Get it here
- Git installed on the command line. Sourcetree has it’s own Git client, but we will need to do some command line stuff. Unfortunately, I can’t offer any tips on setting up Git. I did it several years ago and didn’t make any notes on it.
- A mac. Sorry, but these instructions are for mac users. They will be very similar for PC users, but may need slight modification.
Once you have those things, here’s what you do:
- Create a folder on your machine where you will store your files during this process. I created one called “SVN_TO_GIT” on my desktop.
- Log in to your SVN account and find the SVN repo you want to convert. browse through the files and try to get a list of the user ids that have made commits. For example, in one of my work projects, I found the following user IDs:
andytb9
johnboy
andy
john
toolbox - Create an authors.txt file to convert the old svn IDs to git emails. This is really simple. Just save a blank text file in the folder you created above as “authors.txt”. In this file, add a line for each of the user IDs you found in Step 2. These lines specify how to convert the SVN user IDs:
andy = Andy Watt <andy@gmail.com>
andytb9 = Andy Watt <andy@gmail.com>
johnboy = John Doe <john@gmail.com>
john = John Doe <john@gmail.com>
toolbox = Andy Watt <andy@gmail.com>
**Note how you can actually re-map the project contributors. I could simply assign all SVN IDs to my email if I want.
- Create a subfolder in the SVN_TO_GIT folder you already created. This folder will hold the repo that you will convert, so name it something that makes sense. For this example, I will name mine “REPO_1”.
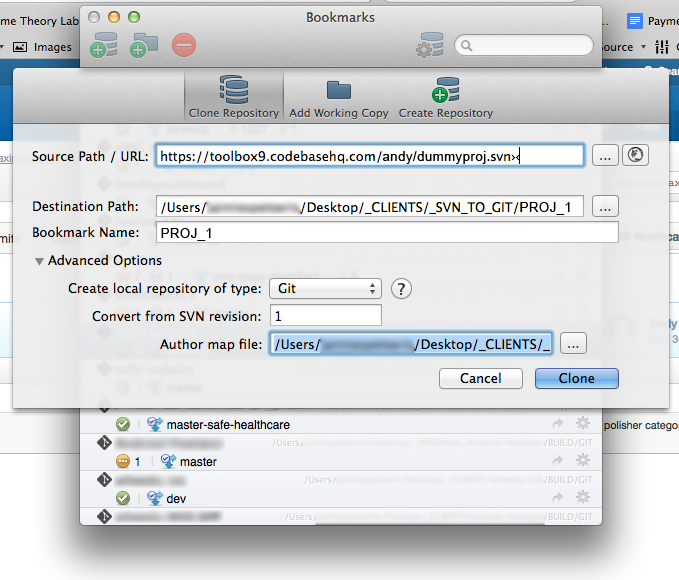
- Open Sourcetree and clone the SVN repo into the REPO_1 folder you created above. Clone it as if it was a Git repo, but enter the URL of the SVN repo. You will probably need to enter your user name and password for the SVN account here.

Sourcetree will notice that it’s an SVN repo and ask you for some details on how to convert it:- Create local repository of type: Git
- Convert from SVN revision: 1
- Author map file: (browse to your authors.txt file)

BTW, after you enter your SVN credentials, make sure that Sourcetree is still planning to save your cloned repo into the REPO_1 folder. Sourcetree has a quirk that sometimes changes this destination folder unexpectedly. - Click “clone”
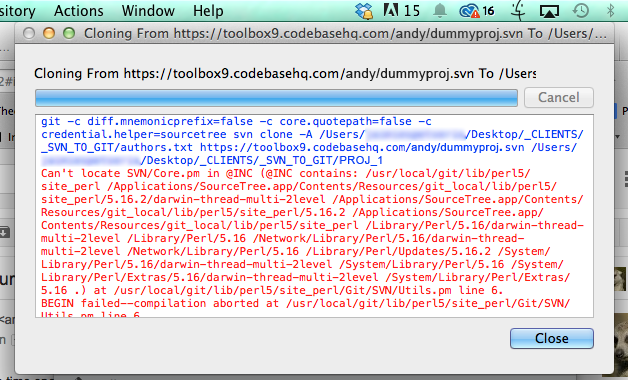
- If you get an error about “Can’t locate SVN/Core.pm”, go here and follow the instructions to get everything hooked up correctly.

- Or… if you get a crazy error like this:
Can't locate object method path via package Git::SVN at /usr/local/git/lib/perl5/site_perl/Git/SVN/Ra.pm line 338.
- go to Sourcetree > Preferences.
- click on the Git tab at the top.
- near the bottom, change the Git version to “Use system Git”
- locate the system Git executable file on your machine. You can do a search in finder for “git” and look for a file with that name – the icon will look like a terminal window.
- that should fix the error
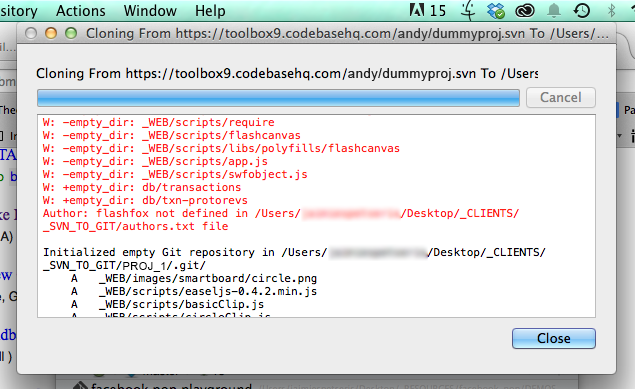
- Show the output and check for errors. If it clones successfully, you’re almost done! If not, you probably forgot a user in the authors.txt file. Scan the errors to see if it is bonking on a user id. Add the conversion to your authors.txt file and try again.

- Log in to Github, Bitbucket, or the Git account of your choice. Create a new repo. Be sure to specify whether this is a public or private repo. I did not add a readme, but it’s ok if you do.
- Copy the url for the new Github repo that you created (in my example: https://github.com/andy/dummy-project.git)
- On your mac, open a terminal window
- cd (change directory) to the SVN_TO_GIT/REPO_1 folder that now contains your cloned repo.
- run the following commands:
git remote set-url origin
git remote set-url origin https://github.com/andy/dummy-project.git
git push origin master
- Alternative method if the previous steps didn’t work for you:
cd /path/to/my/repogit
remote add origin https://tb9andy@bitbucket.org/andy/dummy-project.git
git push -u origin --all
git push -u origin --tags
- After it finishes, log in to github and take a look at your awesome new git repo with all of its commit history. Pat yourself on the back for your awesomeness.
- Create a new folder on your local machine and clone the new github repo into it. This is the local folder you should work from. Don’t work from the SVN_TO_GIT/REPO_1 folder you created. You should be able to delete that now.
- You should remove the old SVN remote and any local references to it on your machine once you’re sure that everything has converted correctly.
If you need to convert an old SVN repository to Git, I hope this will save you some time. If I missed anything, leave a comment and let me know.

